1. 前言 前面关于Spring Security 写了两篇文章,一篇是介绍UsernamePasswordAuthenticationFilter,另一篇是介绍 AuthenticationManager。很多同学表示无法理解这两个东西有什么用,能解决哪些实际问题?所以今天就对这两篇理论进行实战运用,我们从零写一个短信验证码登录并适配到Spring Security 体系中。如果你在阅读中有什么疑问可以回头看看这两篇文章,能解决很多疑惑。
当然你可以修改成邮箱或者其它通讯设备的验证码登录。
2. 验证码生命周期
验证码存在有效期,一般5分钟。 一般逻辑是用户输入手机号后去获取验证码,服务端对验证码进行缓存。在最大有效期内用户只能使用验证码验证成功一次(避免验证码浪费);超过最大时间后失效。
验证码的缓存生命周期
1
2
3
4
5
6
7
8
9
10
11
12
13
14
15
16
17
18
19
20
21
22
23
24
25
public interface CaptchaCacheStorage { String put (String phone) ; String get (String phone) ; void expire (String phone) ; }
我们一般会借助于缓存中间件,比如Redis 、Ehcache 、Memcached 等等来做这个事情。为了方便收看该教程的同学们所使用的不同的中间件。这里我结合Spring Cache 特意抽象了验证码的缓存处理。
1
2
3
4
5
6
7
8
9
10
11
12
13
14
15
16
17
18
19
20
21
22
23
24
private static final String SMS_CAPTCHA_CACHE = "captcha" ;@Bean CaptchaCacheStorage captchaCacheStorage () { return new CaptchaCacheStorage () { @CachePut(cacheNames = SMS_CAPTCHA_CACHE, key = "#phone") @Override public String put (String phone) { return RandomUtil.randomNumbers(5 ); } @Cacheable(cacheNames = SMS_CAPTCHA_CACHE, key = "#phone") @Override public String get (String phone) { return null ; } @CacheEvict(cacheNames = SMS_CAPTCHA_CACHE, key = "#phone") @Override public void expire (String phone) { } }; }
务必保证缓存的可靠性,这与用户的体验息息相关。
接着我们就来编写和业务无关的验证码服务了,验证码服务的核心功能有两个:发送验证码 和验证码校验 。其它的诸如统计、黑名单、历史记录可根据实际业务定制。这里只实现核心功能。
1 2 3 4 5 6 7 8 9 10 11 12 13 14 15 16 17 18 19 20 21 22 23 24 25 26 27 28 29 30 31 32 33 34 35 36 37 38 @Bean public CaptchaService captchaService (CaptchaCacheStorage captchaCacheStorage) { return new CaptchaService () { @Override public boolean sendCaptcha (String phone) { String existed = captchaCacheStorage.get(phone); if (StringUtils.hasText(existed)) { return true ; } String captchaCode = captchaCacheStorage.put(phone); log.info("captcha: {}" , captchaCode); return true ; } @Override public boolean verifyCaptcha (String phone, String code) { String cacheCode = captchaCacheStorage.get(phone); if (Objects.equals(cacheCode, code)) { captchaCacheStorage.expire(phone); return true ; } return false ; } }; }
接下来就可以根据CaptchaService编写短信发送接口/captcha/{phone}了。
1
2
3
4
5
6
7
8
9
10
11
12
13
14
15
16
17
18
19
20
21
22
23
24
25
@RestController @RequestMapping("/captcha") public class CaptchaController { @Resource CaptchaService captchaService; @GetMapping("/{phone}") public Rest<?> captchaByMobile(@PathVariable String phone) { if (captchaService.sendCaptcha(phone)){ return RestBody.ok("验证码发送成功" ); } return RestBody.failure(-999 ,"验证码发送失败" ); } }
3. 集成到Spring Security 下面的教程就必须用到前两篇介绍的知识了。我们要实现验证码登录就必须定义一个Servlet Filter 进行处理。它的作用这里再重复一下:
拦截短信登录接口。
获取登录参数并封装为Authentication凭据。
交给AuthenticationManager认证。
我们需要先定制Authentication和AuthenticationManager
3.1 验证码凭据 Authentication在我看来就是一个载体,在未得到认证之前它用来携带登录的关键参数,比如用户名和密码、验证码;在认证成功后它携带用户的信息和角色集。所以模仿UsernamePasswordAuthenticationToken来实现一个CaptchaAuthenticationToken,去掉不必要的功能,抄就完事儿了:
1
2
3
4
5
6
7
8
9
10
11
12
13
14
15
16
17
18
19
20
21
22
23
24
25
26
27
28
29
30
31
32
33
34
35
36
37
38
39
40
41
42
43
44
45
46
47
48
49
50
51
52
53
54
55
56
57
58
59
60
61
62
63
64
65
66
67
68
69
70
71
package cn.felord.spring.security.captcha;import org.springframework.security.authentication.AbstractAuthenticationToken;import org.springframework.security.core.GrantedAuthority;import org.springframework.security.core.SpringSecurityCoreVersion;import java.util.Collection;public class CaptchaAuthenticationToken extends AbstractAuthenticationToken { private static final long serialVersionUID = SpringSecurityCoreVersion.SERIAL_VERSION_UID; private final Object principal; private String captcha; public CaptchaAuthenticationToken (Object principal, String captcha) { super (null ); this .principal = principal; this .captcha = captcha; setAuthenticated(false ); } public CaptchaAuthenticationToken (Object principal, String captcha, Collection<? extends GrantedAuthority> authorities) { super (authorities); this .principal = principal; this .captcha = captcha; super .setAuthenticated(true ); } public Object getCredentials () { return this .captcha; } public Object getPrincipal () { return this .principal; } public void setAuthenticated (boolean isAuthenticated) throws IllegalArgumentException { if (isAuthenticated) { throw new IllegalArgumentException ( "Cannot set this token to trusted - use constructor which takes a GrantedAuthority list instead" ); } super .setAuthenticated(false ); } @Override public void eraseCredentials () { super .eraseCredentials(); captcha = null ; }
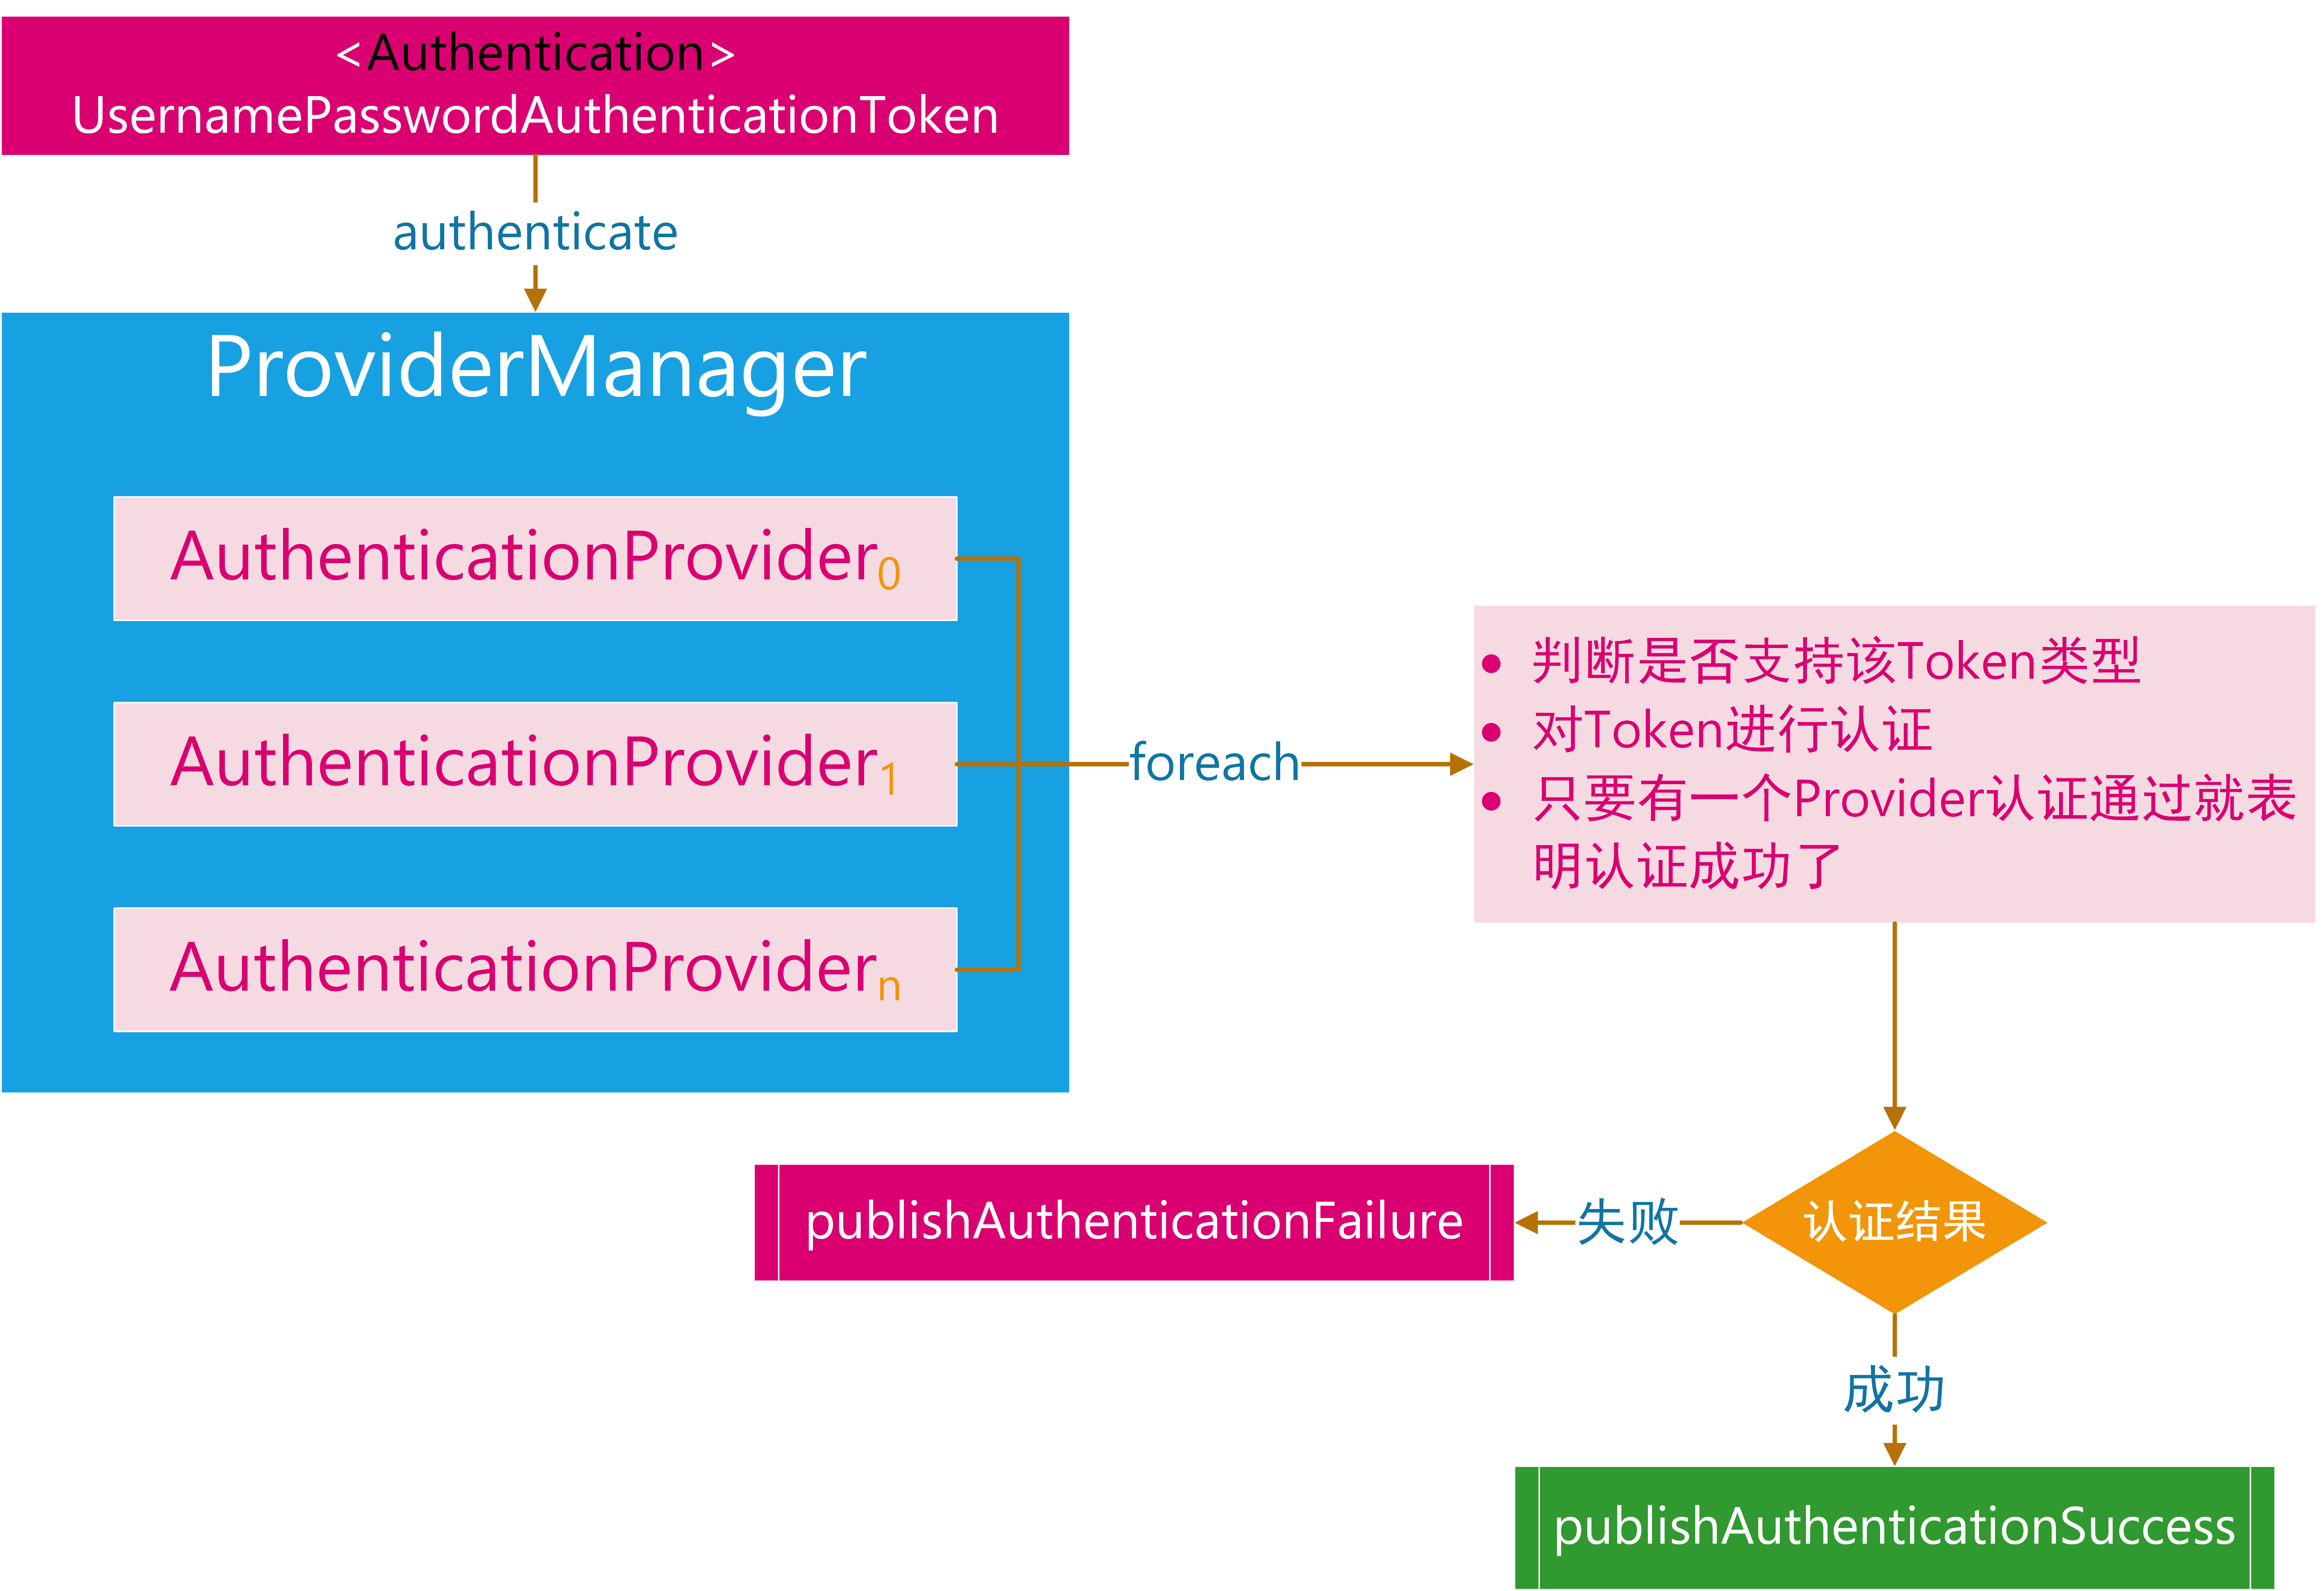
3.2 验证码认证管理器 我们还需要定制一个AuthenticationManager来对上面定义的凭据CaptchaAuthenticationToken进行认证处理。下面这张图有必要再拿出来看一下:
要定义AuthenticationManager只需要定义其实现ProviderManager。而ProviderManager又需要依赖AuthenticationProvider。所以我们要实现一个专门处理CaptchaAuthenticationToken的AuthenticationProvider。AuthenticationProvider的流程是:
从CaptchaAuthenticationToken拿到手机号、验证码。
利用手机号从数据库查询用户信息,并判断用户是否是有效用户,实际上就是实现UserDetailsService接口
验证码校验。
校验成功则封装授信的凭据。
校验失败抛出认证异常。
根据这个流程实现如下:
1
2
3
4
5
6
7
8
9
10
11
12
13
14
15
16
17
18
19
20
21
22
23
24
25
26
27
28
29
30
31
32
33
34
35
36
37
38
39
40
41
42
43
44
45
46
47
48
49
50
51
52
53
54
55
56
57
58
59
60
61
62
63
64
65
66
67
68
69
70
71
72
73
74
75
76
77
78
79
80
81
82
83
84
85
86
87
88
89
90
91
92
93
94
95
96
97
98
99
100
101
102
103
104
105
106
package cn.felord.spring.security.captcha;import lombok.extern.slf4j.Slf4j;import org.springframework.beans.factory.InitializingBean;import org.springframework.context.MessageSource;import org.springframework.context.MessageSourceAware;import org.springframework.context.support.MessageSourceAccessor;import org.springframework.security.authentication.AuthenticationProvider;import org.springframework.security.authentication.BadCredentialsException;import org.springframework.security.core.Authentication;import org.springframework.security.core.AuthenticationException;import org.springframework.security.core.GrantedAuthority;import org.springframework.security.core.SpringSecurityMessageSource;import org.springframework.security.core.authority.mapping.GrantedAuthoritiesMapper;import org.springframework.security.core.authority.mapping.NullAuthoritiesMapper;import org.springframework.security.core.userdetails.UserDetails;import org.springframework.security.core.userdetails.UserDetailsService;import org.springframework.util.Assert;import java.util.Collection;import java.util.Objects;@Slf4j public class CaptchaAuthenticationProvider implements AuthenticationProvider , InitializingBean, MessageSourceAware { private final GrantedAuthoritiesMapper authoritiesMapper = new NullAuthoritiesMapper (); private final UserDetailsService userDetailsService; private final CaptchaService captchaService; private MessageSourceAccessor messages = SpringSecurityMessageSource.getAccessor(); public CaptchaAuthenticationProvider (UserDetailsService userDetailsService, CaptchaService captchaService) { this .userDetailsService = userDetailsService; this .captchaService = captchaService; } @Override public Authentication authenticate (Authentication authentication) throws AuthenticationException { Assert.isInstanceOf(CaptchaAuthenticationToken.class, authentication, () -> messages.getMessage( "CaptchaAuthenticationProvider.onlySupports" , "Only CaptchaAuthenticationToken is supported" )); CaptchaAuthenticationToken unAuthenticationToken = (CaptchaAuthenticationToken) authentication; String phone = unAuthenticationToken.getName(); String rawCode = (String) unAuthenticationToken.getCredentials(); UserDetails userDetails = userDetailsService.loadUserByUsername(phone); if (Objects.isNull(userDetails)) { throw new BadCredentialsException ("Bad credentials" ); } if (captchaService.verifyCaptcha(phone, rawCode)) { return createSuccessAuthentication(authentication, userDetails); } else { throw new BadCredentialsException ("captcha is not matched" ); } } @Override public boolean supports (Class<?> authentication) { return CaptchaAuthenticationToken.class.isAssignableFrom(authentication); } @Override public void afterPropertiesSet () throws Exception { Assert.notNull(userDetailsService, "userDetailsService must not be null" ); Assert.notNull(captchaService, "captchaService must not be null" ); } @Override public void setMessageSource (MessageSource messageSource) { this .messages = new MessageSourceAccessor (messageSource); } protected Authentication createSuccessAuthentication (Authentication authentication, UserDetails user) { Collection<? extends GrantedAuthority > authorities = authoritiesMapper.mapAuthorities(user.getAuthorities()); CaptchaAuthenticationToken authenticationToken = new CaptchaAuthenticationToken (user, null , authorities); authenticationToken.setDetails(authentication.getDetails()); return authenticationToken; } }
然后就可以组装ProviderManager了:
1 ProviderManager providerManager = new ProviderManager (Collections.singletonList(captchaAuthenticationProvider));
经过3.1 和3.2 的准备,我们的准备工作就完成了。
3.3 验证码认证过滤器 定制好验证码凭据和验证码认证管理器后我们就可以定义验证码认证过滤器了。修改一下UsernamePasswordAuthenticationFilter就能满足需求:
1
2
3
4
5
6
7
8
9
10
11
12
13
14
15
16
17
18
19
20
21
22
23
24
25
26
27
28
29
30
31
32
33
34
35
36
37
38
39
40
41
42
43
44
45
46
47
48
49
50
51
52
53
54
55
56
57
58
59
60
61
62
63
64
65
66
67
68
69
package cn.felord.spring.security.captcha;import org.springframework.lang.Nullable;import org.springframework.security.authentication.AuthenticationServiceException;import org.springframework.security.core.Authentication;import org.springframework.security.core.AuthenticationException;import org.springframework.security.web.authentication.AbstractAuthenticationProcessingFilter;import org.springframework.security.web.util.matcher.AntPathRequestMatcher;import javax.servlet.http.HttpServletRequest;import javax.servlet.http.HttpServletResponse;public class CaptchaAuthenticationFilter extends AbstractAuthenticationProcessingFilter { public static final String SPRING_SECURITY_FORM_PHONE_KEY = "phone" ; public static final String SPRING_SECURITY_FORM_CAPTCHA_KEY = "captcha" ; public CaptchaAuthenticationFilter () { super (new AntPathRequestMatcher ("/clogin" , "POST" )); } public Authentication attemptAuthentication (HttpServletRequest request, HttpServletResponse response) throws AuthenticationException { if (!request.getMethod().equals("POST" )) { throw new AuthenticationServiceException ( "Authentication method not supported: " + request.getMethod()); } String phone = obtainPhone(request); String captcha = obtainCaptcha(request); if (phone == null ) { phone = "" ; } if (captcha == null ) { captcha = "" ; } phone = phone.trim(); CaptchaAuthenticationToken authRequest = new CaptchaAuthenticationToken ( phone, captcha); setDetails(request, authRequest); return this .getAuthenticationManager().authenticate(authRequest); } @Nullable protected String obtainCaptcha (HttpServletRequest request) { return request.getParameter(SPRING_SECURITY_FORM_CAPTCHA_KEY); } @Nullable protected String obtainPhone (HttpServletRequest request) { return request.getParameter(SPRING_SECURITY_FORM_PHONE_KEY); } protected void setDetails (HttpServletRequest request, CaptchaAuthenticationToken authRequest) { authRequest.setDetails(authenticationDetailsSource.buildDetails(request)); } }
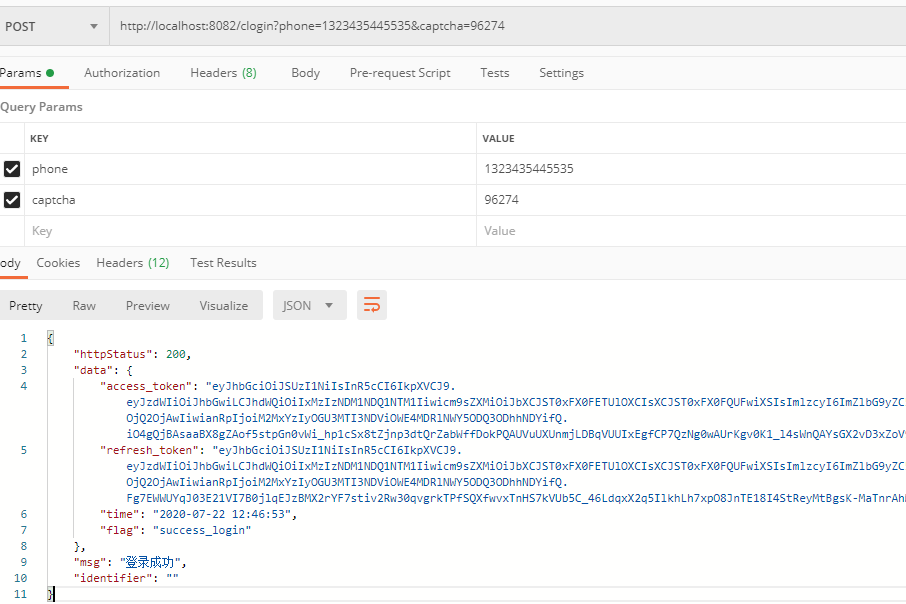
这里我们指定了拦截验证码登陆的请求为:
1
2
3
POST /clogin?phone=手机号&captcha=验证码 HTTP/1.1 Host: localhost:8082
接下来就是配置了。
3.4 配置 我把所有的验证码认证的相关配置集中了起来,并加上了注释。
1
2
3
4
5
6
7
8
9
10
11
12
13
14
15
16
17
18
19
20
21
22
23
24
25
26
27
28
29
30
31
32
33
34
35
36
37
38
39
40
41
42
43
44
45
46
47
48
49
50
51
52
53
54
55
56
57
58
59
60
61
62
63
64
65
66
67
68
69
70
71
72
73
74
75
76
77
78
79
80
81
82
83
84
85
86
87
88
89
90
91
92
93
94
95
96
97
98
99
100
101
102
103
104
105
106
107
108
109
110
111
112
113
114
115
116
117
118
119
120
121
122
123
124
125
126
127
128
129
130
131
132
133
134
135
136
137
138
139
140
141
142
143
144
145
146
147
148
149
150
151
152
153
154
155
package cn.felord.spring.security.captcha;import cn.hutool.core.util.RandomUtil;import lombok.extern.slf4j.Slf4j;import org.springframework.beans.factory.annotation.Qualifier;import org.springframework.cache.annotation.CacheEvict;import org.springframework.cache.annotation.CachePut;import org.springframework.cache.annotation.Cacheable;import org.springframework.context.annotation.Bean;import org.springframework.context.annotation.Configuration;import org.springframework.security.authentication.ProviderManager;import org.springframework.security.core.authority.AuthorityUtils;import org.springframework.security.core.userdetails.User;import org.springframework.security.core.userdetails.UserDetailsService;import org.springframework.security.web.authentication.AuthenticationFailureHandler;import org.springframework.security.web.authentication.AuthenticationSuccessHandler;import org.springframework.util.StringUtils;import java.util.Collections;import java.util.Objects;@Slf4j @Configuration public class CaptchaAuthenticationConfiguration { private static final String SMS_CAPTCHA_CACHE = "captcha" ; @Bean CaptchaCacheStorage captchaCacheStorage () { return new CaptchaCacheStorage () { @CachePut(cacheNames = SMS_CAPTCHA_CACHE, key = "#phone") @Override public String put (String phone) { return RandomUtil.randomNumbers(5 ); } @Cacheable(cacheNames = SMS_CAPTCHA_CACHE, key = "#phone") @Override public String get (String phone) { return null ; } @CacheEvict(cacheNames = SMS_CAPTCHA_CACHE, key = "#phone") @Override public void expire (String phone) { } }; } @Bean public CaptchaService captchaService (CaptchaCacheStorage captchaCacheStorage) { return new CaptchaService () { @Override public boolean sendCaptcha (String phone) { String existed = captchaCacheStorage.get(phone); if (StringUtils.hasText(existed)) { log.warn("captcha code 【 {} 】 is available now" , existed); return false ; } String captchaCode = captchaCacheStorage.put(phone); log.info("captcha: {}" , captchaCode); return true ; } @Override public boolean verifyCaptcha (String phone, String code) { String cacheCode = captchaCacheStorage.get(phone); if (Objects.equals(cacheCode, code)) { captchaCacheStorage.expire(phone); return true ; } return false ; } }; } @Bean @Qualifier("captchaUserDetailsService") public UserDetailsService captchaUserDetailsService () { return username -> User.withUsername(username).password("TEMP" ) .authorities(AuthorityUtils.createAuthorityList("ROLE_ADMIN" , "ROLE_APP" )).build(); } @Bean public CaptchaAuthenticationProvider captchaAuthenticationProvider (CaptchaService captchaService, @Qualifier("captchaUserDetailsService") UserDetailsService userDetailsService) { return new CaptchaAuthenticationProvider (userDetailsService, captchaService); } @Bean public CaptchaAuthenticationFilter captchaAuthenticationFilter (AuthenticationSuccessHandler authenticationSuccessHandler, AuthenticationFailureHandler authenticationFailureHandler, CaptchaAuthenticationProvider captchaAuthenticationProvider) { CaptchaAuthenticationFilter captchaAuthenticationFilter = new CaptchaAuthenticationFilter (); ProviderManager providerManager = new ProviderManager (Collections.singletonList(captchaAuthenticationProvider)); captchaAuthenticationFilter.setAuthenticationManager(providerManager); captchaAuthenticationFilter.setAuthenticationSuccessHandler(authenticationSuccessHandler); captchaAuthenticationFilter.setAuthenticationFailureHandler(authenticationFailureHandler); return captchaAuthenticationFilter; } }
然而这并没有完,你需要将CaptchaAuthenticationFilter配置到整个Spring Security 的过滤器链中,这种看了胖哥教程的同学应该非常熟悉了。
请特别注意: 务必保证登录接口和验证码接口可以匿名访问,如果是动态权限可以给接口添加ROLE_ANONYMOUS角色。
大功告成,测试如下:
而且原先的登录方式不受影响。
4. 总结 通过对UsernamePasswordAuthenticationFilter和 AuthenticationManager的系统学习,我们了解了Spring Security认证的整个流程,本文是对这两篇的一个实际运用。相信看到这一篇后你就不会对前几篇的图解懵逼了,这也是理论到实践的一次尝试。
代码在day11分支
转载自@felord.cn