Coding & Life

求知若饥,虚心若愚

pic

集群概念

Redis集群实现了对Redis的水平扩容,即启动N个Redis节点,将整个数据库分布存储在这N个节点中,每个节点存储总数据的1/N。每个节点负责一部分插槽(slot),注意在Redis Cluster中,只有mater才拥有插槽的所有权。

分片实现

Redis集群通过分片的方式来保存数据库中的键值对,集群的整个数据库被分为16384(0-16383)个槽,数据库中的每个键都属于这16384个槽的其中一个,集群中的每个节点可以处理0个或最多16384个。只有当数据库中的16384个槽都有节点在处理时,集群才处于上线状态。

集群搭建

我们在一台机器上使用6个端口,模拟集群搭建

安装Redis

下载redis安装包,进行解压,编译,安装。此处省略

集群配置

  1. 创建6个节点的配置文件目录conf,日志目录logs,数据存储目录data,如下命令:
1
2
3
4
5
6
7
8
9
10
11
12
13
14
15
16
17
18
19
20
21
22
23
mkdir -p /usr/local/redis/redis_cluster/7001/conf/
mkdir -p /usr/local/redis/redis_cluster/7001/logs/
mkdir -p /usr/local/redis/redis_cluster/7001/data/

mkdir -p /usr/local/redis/redis_cluster/7002/conf/
mkdir -p /usr/local/redis/redis_cluster/7002/logs/
mkdir -p /usr/local/redis/redis_cluster/7002/data/

mkdir -p /usr/local/redis/redis_cluster/7003/conf/
mkdir -p /usr/local/redis/redis_cluster/7003/logs/
mkdir -p /usr/local/redis/redis_cluster/7003/data/

mkdir -p /usr/local/redis/redis_cluster/7004/conf/
mkdir -p /usr/local/redis/redis_cluster/7004/logs/
mkdir -p /usr/local/redis/redis_cluster/7004/data/

mkdir -p /usr/local/redis/redis_cluster/7005/conf/
mkdir -p /usr/local/redis/redis_cluster/7005/logs/
mkdir -p /usr/local/redis/redis_cluster/7005/data/

mkdir -p /usr/local/redis/redis_cluster/7006/conf/
mkdir -p /usr/local/redis/redis_cluster/7006/logs/
mkdir -p /usr/local/redis/redis_cluster/7006/data/
  1. 创建7001的配置文件,并添加如下内容
1
2
3
4
5
6
7
8
9
10
11
12
13
14
15
16
17
18
19
20
21
22
# 绑定服务器域名或IP地址
bind 127.0.0.1
# 设置端口,区分集群中Redis的实例
port 7001
# 后台运行
daemonize yes
# pid进程文件名,以端口号命名
pidfile /var/run/redis-7001.pid
# 日志文件名称,以端口号为目录来区分
logfile /usr/local/redis/redis_cluster/7001/logs/redis.log
# 数据文件存放地址,以端口号为目录名来区分
dir /usr/local/redis/redis_cluster/7001/data
# 启用集群
cluster-enabled yes
# 配置每个节点的配置文件,同样以端口号为名称
cluster-config-file nodes_7001.conf
# 配置集群节点的超时时间
cluster-node-timeout 15000
# 启动AOF增量持久化策略
appendonly yes
# 发生改变,则记录日志
appendfsync always

其他节点配置文件仿照7001分别创建

启动集群

  1. 启动每一个Redis节点
1
2
3
4
5
6
redis-server /usr/local/redis/redis_cluster/7001/conf/redis.conf
redis-server /usr/local/redis/redis_cluster/7002/conf/redis.conf
redis-server /usr/local/redis/redis_cluster/7003/conf/redis.conf
redis-server /usr/local/redis/redis_cluster/7004/conf/redis.conf
redis-server /usr/local/redis/redis_cluster/7005/conf/redis.conf
redis-server /usr/local/redis/redis_cluster/7006/conf/redis.conf
  1. 使用redis-cli创建Redis集群
1
redis-cli --cluster create 127.0.0.1:7001 127.0.0.1:7002 127.0.0.1:7003 127.0.0.1:7004 127.0.0.1:7005 127.0.0.1:7006 --cluster-replicas 1
  • redis-cli --cluster代表集群操作命令
  • create 代表创建集群
  • --cluster-replicas 1 指定集群中每个mater的副本数为1,此时节点总数 ÷ (replicas + 1)得到的就是master的数量n。因此节点列表中的前n个就是master节点,其他节点都是slave节点,随机分配到不同master
  1. 查看刚创建的集群状态,如下命令:(在任一台机器中查看任一节点信息,会带出所有节点信息)
1
redis-cli --cluster check 127.0.0.1:7001

节点信息

  1. 测试集群是否正常

连接集群中任一节点,注意:集群操作时,需要给redis-cli加上-c参数才可以

1
redis-cli -c -p 7001

添加一个key进入集群

1
2
3
4
127.0.0.1:7001> set name wangweiye
-> Redirected to slot [5798] located at 127.0.0.1:7002
OK
127.0.0.1:7002>

可以看到,set之后,Redis会自动重定向到7002节点的5798插槽,接着我们进入7003节点,观察是否能查到此key

1
2
3
4
127.0.0.1:7003> get name
-> Redirected to slot [5798] located at 127.0.0.1:7002
"wangweiye"
127.0.0.1:7002>

出现以上结果,说明我们搭建的集群运作正常。当集群中某个master节点故障时,相应的slave节点会自动升级为master,保证集群的可靠性。当故障节点恢复正常,则变为slave节点提供副本职能,请自行测试

注意

Redis集群中每个实例会使用两个TCP端口,一个用于客户端(redis-cli或其他应用)通信,另一个用于集群中实例相互通信的总线端口,且第二个端口比第一个端口一定大1000。如果外网配置时,请注意网络的连通性

pic

在开发场景中,如果需要对接第三方系统的数据库,与自己的应用结合,这时就需要动态切换数据库进行对接

什么是多数据源

最常见的单一应用中最多涉及到一个数据库,既是一个数据源(DataSource)。那么顾名思义,多数据源就是在一个单一应用中涉及到了两个及以上的数据库。

其实在配置数据源的时候就已经很明确这个定义了,如以下代码:

1
2
3
4
5
6
7
8
9
@Bean(name = "dataSource")
public DataSource dataSource() {
DruidDataSource druidDataSource = new DruidDataSource();
druidDataSource.setUrl(url);
druidDataSource.setUsername(username);
druidDataSource.setDriverClassName(driverClassName);
druidDataSource.setPassword(password);
return druidDataSource;
}

urlusernamepassword这三个属性已经唯一确定了一个数据库了,DataSource则是依赖这三个创建出来的。则多数据源即是配置多个DataSource

应用场景

相信大多数做过医疗系统的都会和HIS打交道,为了简化护士以及医生的操作流程,必须要将必要的信息从HIS系统对接过来,对接方式可以通过HIS提供视图,比如医护视图,患者视图等,而此时其他系统只需要定时从HIS视图中读取数据同步到自己数据库中即可。这是就涉及到了至少两个数据库了,一个是HIS数据库,一个自己系统的数据库,在单一应用中必然需要用到多数据源切换才能达到目的。

整合单一的数据源

本文使用阿里的数据库连接池druid,添加依赖如下:

1
2
3
4
5
<dependency>
<groupId>com.alibaba</groupId>
<artifactId>druid-spring-boot-starter</artifactId>
<version>1.2.9</version>
</dependency>

Druid连接池的starter的自动配置类是DruidDataSourceAutoConfigure,类上标注如下一行注解:

1
@EnableConfigurationProperties({DruidStatProperties.class, DataSourceProperties.class})

@EnableConfigurationProperties这个注解使得配置文件中的配置生效并且映射到指定类的属性

DruidStatProperties中指定的前缀是spring.datasource.druid,这个配置主要是用来设置连接池的一些参数。

DataSourceProperties中指定的前缀是spring.datasource,这个主要是用来设置数据库的urlusernamepassword等信息。

因此我们只需要在全局配置文件中指定数据库的一些配置以及连接池的一些配置信息即可,前缀分别是spring.datasource.druidspring.datasource

在全局配置文件application.yml中配置数据库信息即可注入一个数据源到Spring Boot中。其实这仅仅是一种方式,下面介绍另外一种方式。

在自动配置类中DruidDataSourceAutoConfigure中有如下一段代码:

1
2
3
4
5
6
@Bean(initMethod = "init")
@ConditionalOnMissingBean
public DataSource dataSource() {
LOGGER.info("Init DruidDataSource");
return new DruidDataSourceWrapper();
}

@ConditionalOnMissingBean@Bean这两个注解的结合,意味着我们可以覆盖,只需要提前在IOC中注入一个DataSource类型的Bean即可。

因此我们在自定义的配置类中定义如下配置即可:

1
2
3
4
5
6
7
8
9
10
11
/**
* @Bean:向IOC容器中注入一个Bean
* @ConfigurationProperties:使得配置文件中以spring.datasource为前缀的属性映射到Bean的属性中
* @return
*/
@ConfigurationProperties(prefix = "spring.datasource")
@Bean
public DataSource dataSource(){
//做一些其他的自定义配置,比如密码加密等......
return new DruidDataSource();
}

以上介绍了两种数据源的配置方式,第一种比较简单,第二种适合扩展,按需选择

整合Mybatis

Spring Boot整合Mybatis其实很简单,简单的几步就搞定,首先添加依赖:

1
2
3
4
5
<dependency>
<groupId>org.mybatis.spring.boot</groupId>
<artifactId>mybatis-spring-boot-starter</artifactId>
<version>2.0.0</version>
</dependency>

第二步找到自动配置类MybatisAutoConfiguration,有如下一行代码:

1
@EnableConfigurationProperties({MybatisProperties.class})

老套路了,全局配置文件中配置前缀为mybatis的配置将会映射到该类中的属性

直接在全局配置文件配置各种属性是一种比较简单的方式,其实的任何组件的整合都有不少于两种的配置方式,下面来介绍下配置类如何配置。

MybatisAutoConfiguration自动配置类中有如下一段代码:

1
2
3
@Bean
@ConditionalOnMissingBean
public SqlSessionFactory sqlSessionFactory(DataSource dataSource) throws Exception {}

@ConditionalOnMissingBean@Bean真是老搭档了,意外着我们又可以覆盖,只需要在IOC容器中注入SqlSessionFactory(Mybatis六剑客之一生产者)

在自定义配置类中注入即可,如下:

1
2
3
4
5
6
7
8
9
10
11
12
13
14
15
16
/**
* 注入SqlSessionFactory
*/
@Bean("sqlSessionFactory1")
public SqlSessionFactory sqlSessionFactory(DataSource dataSource) throws Exception {
SqlSessionFactoryBean sqlSessionFactoryBean = new SqlSessionFactoryBean();
sqlSessionFactoryBean.setDataSource(dataSource);
sqlSessionFactoryBean.setMapperLocations(new PathMatchingResourcePatternResolver().getResources("classpath*:/mapper/**/*.xml"));
org.apache.ibatis.session.Configuration configuration = new org.apache.ibatis.session.Configuration();
// 自动将数据库中的下划线转换为驼峰格式
configuration.setMapUnderscoreToCamelCase(true);
configuration.setDefaultFetchSize(100);
configuration.setDefaultStatementTimeout(30);
sqlSessionFactoryBean.setConfiguration(configuration);
return sqlSessionFactoryBean.getObject();
}

以上介绍了配置Mybatis的两种方式,其实在大多数场景中使用第一种已经够用了,至于为什么介绍第二种呢?当然是为了多数据源的整合而做准备了。

MybatisAutoConfiguration中有一行很重要的代码,如下:

1
@ConditionalOnSingleCandidate(DataSource.class)

@ConditionalOnSingleCandidate这个注解的意思是当IOC容器中只有一个候选Bean的实例才会生效。言外之意就是当IOC容器中只有一个数据源DataSource,这个自动配置类才会生效

哦?照这样搞,多数据源是不是不能用Mybatis?

可能大家会有一个误解,认为多数据源就是多个的DataSource并存的,当然这样说也不是不正确。

多数据源的情况下并不是多个数据源并存的,Spring提供了AbstractRoutingDataSource这样一个抽象类,使得能够在多数据源的情况下任意切换,相当于一个动态路由的作用,作者称之为动态数据源。因此Mybatis只需要配置这个动态数据源即可。

什么是动态数据源

动态数据源简单的说就是能够自动切换的数据源,类似于一个动态路由的感觉,Spring提供了一个抽象类AbstractRoutingDataSource,这个抽象类中有一个属性,如下:

1
private Map<Object, Object> targetDataSources;

targetDataSources是一个Map结构,所有需要切换的数据源都存放在其中,根据指定的KEY进行切换。当然还有一个默认的数据源。

AbstractRoutingDataSource这个抽象类中有一个抽象方法需要子类实现,如下:

1
protected abstract Object determineCurrentLookupKey();

determineCurrentLookupKey()这个方法的返回值决定了需要切换的数据源的KEY,就是根据这个KEYtargetDataSources取值(数据源)

数据源切换如何保证线程隔离?

数据源属于一个公共的资源,在多线程的情况下如何保证线程隔离呢?不能我这边切换了影响其他线程的执行。

“说到线程隔离,自然会想到ThreadLocal了,将切换数据源的KEY(用于从targetDataSources中取值)存储在ThreadLocal中,执行结束之后清除即可”

单独封装了一个DataSourceHolder,内部使用ThreadLocal隔离线程,代码如下:

1
2
3
4
5
6
7
8
9
10
11
12
13
14
15
16
17
18
19
20
21
22
23
/**
* 使用ThreadLocal存储切换数据源后的KEY
*/
public class DataSourceHolder {

//线程 本地环境
private static final ThreadLocal<String> dataSources = new InheritableThreadLocal();

//设置数据源
public static void setDataSource(String datasource) {
dataSources.set(datasource);
}

//获取数据源
public static String getDataSource() {
return dataSources.get();
}

//清除数据源
public static void clearDataSource() {
dataSources.remove();
}
}

如何构造一个动态数据源?

上文说过只需继承一个抽象类AbstractRoutingDataSource,重写其中的一个方法determineCurrentLookupKey()即可。代码如下:

1
2
3
4
5
6
7
8
9
10
11
12
13
14
15
16
17
18
19
20
21
22
23
24
25
26
27
28
/**
* 动态数据源,继承AbstractRoutingDataSource
*/
public class DynamicDataSource extends AbstractRoutingDataSource {

/**
* 返回需要使用的数据源的key,将会按照这个KEY从Map获取对应的数据源(切换)
* @return
*/
@Override
protected Object determineCurrentLookupKey() {
//从ThreadLocal中取出KEY
return DataSourceHolder.getDataSource();
}

/**
* 构造方法填充Map,构建多数据源
*/
public DynamicDataSource(DataSource defaultTargetDataSource, Map<Object, Object> targetDataSources) {
// 默认的数据源,可以作为主数据源
super.setDefaultTargetDataSource(defaultTargetDataSource);
// 目标数据源
super.setTargetDataSources(targetDataSources);
// 执行afterPropertiesSet方法,完成属性的设置
super.afterPropertiesSet();
}

}

上述代码很简单,分析如下:

  1. 一个多参的构造方法,指定了默认的数据源和目标数据源。
  2. 重写determineCurrentLookupKey()方法,返回数据源对应的KEY,这里是直接从ThreadLocal中取值,就是上文封装的DataSourceHolder

定义一个注解

为了操作方便且低耦合,不能每次需要切换数据源的时候都要手动调一下接口吧,可以定义一个切换数据源的注解,如下:

1
2
3
4
5
6
7
8
9
10
11
12
13
14
15
16
17
18
/**
* 切换数据源的注解
*/
@Target(value = ElementType.METHOD)
@Retention(value = RetentionPolicy.RUNTIME)
@Documented
public @interface SwitchSource {

/**
* 默认切换的数据源KEY
*/
String DEFAULT_NAME = "hisDataSource";

/**
* 需要切换到数据的KEY
*/
String value() default DEFAULT_NAME;
}

注解中只有一个value属性,指定了需要切换数据源的KEY

有注解还不行,当然还要有切面,代码如下:

1
2
3
4
5
6
7
8
9
10
11
12
13
14
15
16
17
18
19
20
21
22
23
24
25
26
27
28
29
30
31
32
33
34
35
@Aspect
// 优先级要设置在事务切面执行之前
@Order(1)
@Component
@Slf4j
public class DataSourceAspect {


@Pointcut("@annotation(SwitchSource)")
public void pointcut() {
}

/**
* 在方法执行之前切换到指定的数据源
* @param joinPoint
*/
@Before(value = "pointcut()")
public void beforeOpt(JoinPoint joinPoint) {
/*因为是对注解进行切面,所以这边无需做过多判定,直接获取注解的值,进行环绕,将数据源设置成远方,然后结束后,清楚当前线程数据源*/
Method method = ((MethodSignature) joinPoint.getSignature()).getMethod();
SwitchSource switchSource = method.getAnnotation(SwitchSource.class);
log.info("[Switch DataSource]:" + switchSource.value());
DataSourceHolder.setDataSource(switchSource.value());
}

/**
* 方法执行之后清除掉ThreadLocal中存储的KEY,这样动态数据源会使用默认的数据源
*/
@After(value = "pointcut()")
public void afterOpt() {
DataSourceHolder.clearDataSource();
log.info("[Switch Default DataSource]");
}

}

这个ASPECT很容易理解,beforeOpt()在方法之前执行,取值@SwitchSource中value属性设置到ThreadLocal中;afterOpt()方法在方法执行之后执行,清除掉ThreadLocal中的KEY,保证了如果不切换数据源,则用默认的数据源。

如何与Mybatis整合?

单一数据源与Mybatis整合上文已经详细讲解了,数据源DataSource作为参数构建了SqlSessionFactory,同样的思想,只需要把这个数据源换成动态数据源即可。注入的代码如下:

1
2
3
4
5
6
7
8
9
10
11
12
13
14
15
16
17
18
/**
* 创建动态数据源的SqlSessionFactory,传入的是动态数据源
*
* @Primary这个注解很重要,如果项目中存在多个SqlSessionFactory,这个注解一定要加上
*/
@Primary
@Bean("sqlSessionFactory")
public SqlSessionFactory sqlSessionFactoryBean(DynamicDataSource dynamicDataSource) throws Exception {
SqlSessionFactoryBean sqlSessionFactoryBean = new SqlSessionFactoryBean();
sqlSessionFactoryBean.setDataSource(dynamicDataSource);
org.apache.ibatis.session.Configuration configuration = new org.apache.ibatis.session.Configuration();
// 自动将数据库中的下划线转换为驼峰格式
configuration.setMapUnderscoreToCamelCase(true);
configuration.setDefaultFetchSize(100);
configuration.setDefaultStatementTimeout(30);
sqlSessionFactoryBean.setConfiguration(configuration);
return sqlSessionFactoryBean.getObject();
}

与Mybatis整合很简单,只需要把数据源替换成自定义的动态数据源DynamicDataSource

那么动态数据源如何注入到IOC容器中呢?看上文自定义的DynamicDataSource构造方法,肯定需要两个数据源了,因此必须先注入两个或者多个数据源到IOC容器中,如下:

1
2
3
4
5
6
7
8
9
10
11
12
13
14
15
16
17
18
19
/**
* @Bean:向IOC容器中注入一个Bean
* @ConfigurationProperties:使得配置文件中以spring.datasource为前缀的属性映射到Bean的属性中
*/
@ConfigurationProperties(prefix = "spring.datasource")
@Bean("dataSource")
public DataSource dataSource() {
return new DruidDataSource();
}

/**
* 向IOC容器中注入另外一个数据源
* 全局配置文件中前缀是spring.datasource.his
*/
@Bean(name = SwitchSource.DEFAULT_NAME)
@ConfigurationProperties(prefix = "spring.datasource.his")
public DataSource hisDataSource() {
return new DruidDataSource();
}

以上构建的两个数据源,一个是默认的数据源,一个是需要切换到的数据源(targetDataSources),这样就组成了动态数据源了。数据源的一些信息,比如urlusername需要自己在全局配置文件中根据指定的前缀配置即可,代码不再贴出

动态数据源的注入代码如下:

1
2
3
4
5
6
7
8
9
10
11
12
13
14
15
16
17
18
/**
* 创建动态数据源的SqlSessionFactory,传入的是动态数据源
*
* @Primary这个注解很重要,如果项目中存在多个SqlSessionFactory,这个注解一定要加上
*/
@Primary
@Bean("sqlSessionFactory")
public SqlSessionFactory sqlSessionFactoryBean(DynamicDataSource dynamicDataSource) throws Exception {
SqlSessionFactoryBean sqlSessionFactoryBean = new SqlSessionFactoryBean();
sqlSessionFactoryBean.setDataSource(dynamicDataSource);
org.apache.ibatis.session.Configuration configuration = new org.apache.ibatis.session.Configuration();
// 自动将数据库中的下划线转换为驼峰格式
configuration.setMapUnderscoreToCamelCase(true);
configuration.setDefaultFetchSize(100);
configuration.setDefaultStatementTimeout(30);
sqlSessionFactoryBean.setConfiguration(configuration);
return sqlSessionFactoryBean.getObject();
}

这里还有一个问题:IOC中存在多个数据源了,那么事务管理器怎么办呢?它也懵逼了,到底选择哪个数据源呢?因此事务管理器肯定还是要重新配置的

事务管理器此时管理的数据源将是动态数据源DynamicDataSource,配置如下:

1
2
3
4
5
6
7
8
/**
* 重写事务管理器,管理动态数据源
*/
@Primary
@Bean(value = "transactionManager2")
public PlatformTransactionManager annotationDrivenTransactionManager(DynamicDataSource dataSource) {
return new DataSourceTransactionManager(dataSource);
}

至此,Mybatis与多数据源的整合就完成了

源码地址

GitHub

参考@dd

ResponseEntity

ResponseEntity对象是Spring对请求响应的封装。它集成了HttpEntity对象,包含了http的响应码(httpstatus)、响应头(header)、响应体(body)三个部分。一个获取用户信息的Spring MVC接口通常我们直接返回实体即可(配合@RestController)

1
2
3
4
5
6
@GetMapping("/user")
public User userinfo() {
User user = new User();
user.setUsername("felord.cn");
return user;
}

等同于使用ResponseEntity作为控制器接口的返回值:

1
2
3
4
5
6
@GetMapping("/user")
public ResponseEntity<User> userinfo() {
User user = new User();
user.setUsername("felord.cn");
return ResponseEntity.ok(user);
}

但是使用ResponseEntity时我们可以做更多事情

自定义响应码

上面的ResponseEntity.ok已经包含了返回200Http响应码,我们还可以通过ResponseEntity.status(HttpStatus|int)来自定义返回的响应码

自定义响应体

放置响应的响应体,通常就是我们接口的数据,这里是一个例子:

1
ResponseEntity.status(HttpStatus.ok).body(Object)

响应头

通常我们制定Spring MVC接口的响应头是通过@RequestMapping和其Restful系列注解中的header()consumesproduces()这几个属性设置。如果你使用了ResponseEntity,可以通过链式调用来设置:

1
2
3
4
5
6
ResponseEntity.status(HttpStatus.ok)
.allow(HttpMethod.GET)
.contentType(MediaType.APPLICATION_JSON)
.contentLength(1048576)
.header("My-Header","felord.cn")
.build();

所有的标准请求头都有对应的设置方法,你也可以通过header(String headerName, String... headerValues)设置自定义请求头

大致原理

我们来看一个用来处理Spring MVC控制器接口返回值的抽象接口HandlerMethodReturnValueHandler

1
2
3
4
5
6
7
8
9
10
11
public interface HandlerMethodReturnValueHandler {
/**
* 支持的返回值类型
*/
boolean supportsReturnType(MethodParameter returnType);

/**
* 将数据绑定到视图,并设置处理标志以指示已直接处理响应,后续的其它方法就不处理了,优先级非常高
*/
void handleReturnValue(@Nullable Object returnValue, MethodParameter returnType, ModelAndViewContainer mavContainer, NativeWebRequest webRequest) throws Exception;
}

它的一个重要实现HttpEntityMethodProcessor就是处理返回类型为HttpEntity的控制器方法的处理器。它会把ResponseEntity携带的三种信息交给ServletServerHttpResponse对象渲染视图,并设置处理标志以指示已直接处理响应,后续的其他方法不处理了,优先级非常高

实战运用

通常让你写个下载文件接口都是拿到HttpServletResponse对象,然后配置好Content-Type往里面写流。如果用ResponseEntity会更加简单优雅

1
2
3
4
5
6
7
8
@GetMapping("/download")
public ResponseEntity<Resource> load() {
ClassPathResource classPathResource = new ClassPathResource("application.yml");
String filename = classPathResource.getFilename();
HttpHeaders httpHeaders = new HttpHeaders();
httpHeaders.setContentDisposition(ContentDisposition.inline().filename(filename, StandardCharsets.UTF_8).build());
return ResponseEntity.ok().headers(httpHeaders).body(classPathResource);
}

上面是一个把Spring Boot配置文件application.yml下载下来的例子。主要分为三步:

  • 将要下载的文件封装成org.springframework.core.io.Resource对象,它有很多实现。这里用了ClassPathResource,其他InputStreamResourcePathResource都是常用的实现。

  • 然后配置下载请求头Content-Disposition。针对下载它有两种模式:inline表示在浏览器直接展示文件内容;attachment表示下载为文件。另外下载后的文件名也在这里指定,请不要忘记文件扩展名,例如这里application.yml。如果不指定Content-Disposition,你需要根据文件扩展名设置对应的Content-Type,会麻烦一些。

  • 最后是组装ResponseEntity<Resource>返回。

转载自@felord.cn

时间过得真是快,现在已经是2022年了。作为开发来说,时间处理是非常繁琐的。从Java 8开始有了新的时间API、时间的处理更加优雅,不再需要借助三方类库,而且线程安全。今天来梳理一下新API的格式化

新API的时间格式化

新的时间API的时间格式化由java.time.format.DateTimeFormatter负责

本地化时间

结合枚举FormatStyle定义的风格,DateTimeFormatter预定义了基于本地(Local)风格的时间格式。我们来看这段代码:

1
String format = DateTimeFormatter.ofLocalizedDateTime(FormatStyle.MEDIUM).format(ZonedDateTime.now());

如果你在中国,格式化结果:

1
202216日 下午4:22:01

如果你在美国:

1
Jan 6, 2022, 4:21:10 PM

有三个静态方法及其重载来格式化本地化时间,具体已经整了成了思维导图:

格式化时间图

ISO/RFC规范格式

DateTimeFormatter还内置了ISORFC的时间格式,基于内置的DateTimeFormatter静态实现。举个例子:

1
2
3
4
5
// 静态实例
DateTimeFormatter isoWeekDateFormatter = DateTimeFormatter.ISO_WEEK_DATE;
// 执行格式化
String format = isoWeekDateFormatter.format(LocalDateTime.now());
// format = 2022-W01-4

其他的如下表格所示:

范式格式化

这种方式应该是我们最常用的方式了。通过字母和符号构建一个范式(Patterns),使用ofPattern(String)或者ofPattern(String, Locale)方式传递构建的范式。例如,d MMM uuuu将把2011-12-03格式化为2011年12月3日。从一个模式中创建的格式可以根据需要多次使用,它是不可改变的,并且是线程安全的。

相信什么yyyy-MM-dd HH:mm:ss你都玩腻了,下面给你看点没有见过的:

1
2
3
4
// 最后面是两个V 不是W 单个V会报错 
String pattern = "G uuuu'年'MMMd'日' ZZZZZ VV";
String format= DateTimeFormatter.ofPattern(pattern).format(ZonedDateTime.now());
// format = 公元 2022年1月7日 +08:00 Asia/Shanghai

表格给你整理好了,你试一试:

转载自@felord.cn

事务四个特性:原子性 一致性 隔离性 持久性,下面详细介绍事务的隔离性

定义

与原子性、持久性侧重于研究事务本身不同,隔离性研究的是不同事务之间的相互影响。隔离性是指,事务内部的操作与其他事务是隔离的,并发执行的各个事务之间不能互相干扰。严格的隔离性,对应了事务隔离级别中的 Serializable(可串行化) 但实际应用中出于性能方面的考虑很少会使用可串行化。

锁机制

首先来看两个事务的写操作之间的相互影响。隔离性要求同一时刻只能有一个事务对数据进行写操作,InnoDB通过锁机制来保证这一点。

锁机制的基本原理可以概括为:事务在修改数据之前,需要先获得相应的锁;获得锁之后,事务便可以修改数据;该事务操作期间,这部分数据是锁定的,其他事务如果需要修改数据,需要等待当前事务提交或回滚后释放锁。

行锁与表锁

按照粒度,锁可以分为表锁、行锁以及其他位于两者之间的锁。表锁在操作数据时会锁定整张表,并发性能较差;行锁则只锁定需要操作的数据,并发性能好。但是由于加锁本身需要消耗资源(获得锁、检查锁、释放锁等都需要消耗资源),因此在锁定数据较多情况下使用表锁可以节省大量资源。MySQL中不同的存储引擎支持的锁是不一样的,例如MyIsam只支持表锁,而InnoDB同时支持表锁和行锁,且出于性能考虑,绝大多数情况下使用的都是行锁。

如何查看锁信息

有多种方法可以查看InnoDB中锁的情况,例如:

1
2
select * from information_schema.innodb_locks; #锁的概况
show engine innodb status; #InnoDB整体状态,其中包括锁的情况

下面来看一个例子:

1
2
3
4
5
6
#在事务A中执行:
start transaction;
update account SET balance = 1000 where id = 1;
#在事务B中执行:
start transaction;
update account SET balance = 2000 where id = 1;

此时查看锁的情况:

show engine innodb status查看锁相关的部分:

通过上述命令可以查看事务24052和24053占用锁的情况;其中lock_type为RECORD,代表锁为行锁(记录锁);lock_mode为X,代表排它锁(写锁)。

脏读、不可重复读和幻读

首先来看并发情况下,读操作可能存在的三类问题:

  1. 脏读:当前事务(A)中可以读到其他事务(B)未提交的数据,这种现象就是脏读。举例如下(以账户余额表为例):

  1. 不可重复读:在事务A中先后两次读取同一数据,两次读取的结果不一样,这种现象成为不可重复读。脏读与不可重复读的区别在于:前者读到的是其他事务未提交的数据,后者读到的是其他事务已提交的数据。举例如下:

  1. 幻读:在事务A中按照某个条件先后两次查询数据库,两次查询结果的条数不同,这种现象称为幻读。不可重复读与幻读的区别可以通俗的理解为:前者数据变了,后者是数据的行数变了。举例如下:

事务隔离级别

SQL标准中定义了四种隔离级别,并规定了每种隔离级别下上述几个问题是否存在。一般来说,隔离级别越低,系统开销越低,可支持的并发越高,但隔离性也越差。隔离级别与读问题的关系如下:

在实际应用中 读未提交 在并发时会导致很多问题,而性能相对于其他隔离级别提高缺很有限,因此使用较少 可串行化 强制事务串行,并发效率很低,只有当数据一致性要求极高且可以接受没有并发时使用,因此使用也较少。因此在大多数数据库系统中,默认的隔离级别是 读已提交(如Oracle)可重复读(后文简称RR)

可以通过如下两个命令分别查看全局隔离级别和本次会话的隔离级别:

InnoDB默认的隔离级别是RR,后文会重点介绍RR。需要注意的是,在SQL标准中,RR是无法避免幻读问题的,但是InnoDB实现的RR避免了幻读问题。

1
2
3
4
5
6
7
8
9
10
11
12
13
14
15
16
17
18
19
20
21
22
23
24
25
26
27
28
29
30
31
32
public class Main { // 1.第一步,准备加载类

public static void main(String[] args) {
new Main(); // 4.第四步,执行main方法,new一个类,但在new之前要处理匿名代码块
}

static int num = 4; // 2.第二步,静态变量和静态代码块的加载顺序由编写先后决定

{
num += 3;
System.out.println("b"); // 5.第五步,按照顺序加载匿名代码块,代码块中有打印
}

int a = 5; // 6.第六步,按照顺序加载变量

{ // 成员变量第三个
System.out.println("c"); // 7.第七步,按照顺序打印c
}

Main() { // 类的构造函数,第四个加载
System.out.println("d"); // 8.第八步,最后加载构造函数,完成对象的建立
}

static { // 3.第三步,静态块,然后执行静态代码块,因为有输出,故打印a
System.out.println("a");
}

static void run() // 静态方法,调用的时候才加载 注意看,e没有加载
{
System.out.println("e");
}
}

执行以上代码可以总结加载顺序:静态代码块(静态变量) -> 匿名代码块(成员变量) -> 构造方法 -> 静态方法(不调用不加载

  • 静态代码块只加载一次
  • 静态方法只有调用才会加载
  • 静态代码块和静态变量按照代码编写前后顺序执行
  • 匿名代码块和成员变量按照代码编写前后顺序执行
1
2
3
4
5
public class Print {
public Print(String s) {
System.out.println(s + " ");
}
}
1
2
3
4
5
6
7
8
9
10
11
12
13
14
15
16
17
18
19
public class Parent {
public static Print obj1 = new Print("1");

public Print obj2 = new Print("2");

public static Print obj3 = new Print("3");

static {
new Print("4");
}

public static Print obj4 = new Print("5");

public Print obj5 = new Print("6");

public Parent() {
new Print("7");
}
}
1
2
3
4
5
6
7
8
9
10
11
12
13
14
15
16
17
18
19
20
21
22
23
public class Child extends Parent {
static {
new Print("a");
}

public static Print obj1 = new Print("b");

public Print obj2 = new Print("c");

public Child() {
new Print("d");
}

public static Print obj3 = new Print("e");

public Print obj4 = new Print("f");

public static void main(String[] args) {
Parent obj1 = new Child();

Parent obj2 = new Child();
}
}

执行main方法打印顺序:1 3 4 5 a b e 2 6 7 c f d 2 6 7 c f d

  • 先执行父类的静态代码块和静态变量初始化,并且静态代码块和静态变量的执行顺序只跟代码中出现的顺序有关;
  • 执行子类的静态代码块和静态变量初始化;
  • 执行父类的实例变量初始化;
  • 执行父类的构造函数;
  • 执行子类的实例变量初始化;
  • 执行子类的构造函数;

如果类已经被加载,则静态代码块和静态变量就不用重复执行,再创建类对象时,只执行与实例相关变量初始化和构造方法

1. 前言

我们上一篇介绍了UsernamePasswordAuthenticationFilter的工作流程,留下了一个小小的伏笔,作为一个Servlet Filter应该存在一个doFilter实现方法,而它却没有,其实它的父类AbstractAuthenticationProcessingFilter提供了具体的实现。稍后我们会根据这个实现引出今天的主角AuthenticationManager,来继续介绍用户的认证过程。

2. AbstractAuthenticationProcessingFilter

AbstractAuthenticationProcessingFilter作为UsernamePasswordAuthenticationFilter的父类,实现了认证过滤器的处理逻辑。我们来看看它的核心方法doFilter的实现:

1
2
3
4
5
6
7
8
9
10
11
12
13
14
15
16
17
18
19
20
21
22
23
24
25
26
27
28
29
30
31
32
33
34
35
36
37
38
39
40
41
42
43
44
45
46
47
48
49
50
51
52
53
public void doFilter(ServletRequest req, ServletResponse res, FilterChain chain)
throws IOException, ServletException {

HttpServletRequest request = (HttpServletRequest) req;
HttpServletResponse response = (HttpServletResponse) res;

// 先通过请求的uri来判断是否需要认证,比如默认的/login
if (!requiresAuthentication(request, response)) {
chain.doFilter(request, response);

return;
}

if (logger.isDebugEnabled()) {
logger.debug("Request is to process authentication");
}

Authentication authResult;

try {
// 接着就是执行子类钩子方法attemptAuthentication来获取认证结果对象Authentication ,这个对象不能是空 否则直接返回
authResult = attemptAuthentication(request, response);
if (authResult == null) {
// return immediately as subclass has indicated that it hasn't completed
// authentication
return;
}
// 处理session 策略,这里默认没有任何策略
sessionStrategy.onAuthentication(authResult, request, response);
}
catch (InternalAuthenticationServiceException failed) {
logger.error(
"An internal error occurred while trying to authenticate the user.",
failed);
// 如果遇到异常 就会交给认证失败处理器 AuthenticationFailureHandler 来处理
unsuccessfulAuthentication(request, response, failed);

return;
}
catch (AuthenticationException failed) {
// Authentication failed
unsuccessfulAuthentication(request, response, failed);

return;
}

// 认证成功后继续其它过滤器链 并最终交给认证成功处理器 AuthenticationSuccessHandler 处理
if (continueChainBeforeSuccessfulAuthentication) {
chain.doFilter(request, response);
}

successfulAuthentication(request, response, chain, authResult);
}

大部分逻辑这里是清晰的,关键在于attemptAuthentication方法,这个我们已经在上一文分析了是通过AuthenticationManagerauthenticate方法进行认证逻辑的处理,接下来我们将重点分析这个接口来帮助我们了解Spring Seucirty的认证过程。

3. AuthenticationManager

AuthenticationManager这个接口方法非常奇特,入参和返回值的类型都是Authentication。该接口的作用是对用户的未授信凭据进行认证,认证通过则返回授信状态的凭据,否则将抛出认证异常AuthenticationException

3.1 AuthenticationManager的初始化流程

那么AbstractAuthenticationProcessingFilter中的 AuthenticationManager是在哪里配置的呢?看过之前文章的应该知道WebSecurityConfigurerAdapter中的void configure(AuthenticationManagerBuilder auth)是配置AuthenticationManager的地方,我根据源码总结了一下AuthenticationManager的初始化流程,相信可以帮助你去阅读相关的源码:

需要注意的是如果我们使用自定义配置一定不能按照类似下面的错误示范:

1
2
3
4
5
6
7
8
9
@Override
protected void configure(AuthenticationManagerBuilder auth) throws Exception {
DaoAuthenticationProvider daoAuthenticationProvider = new DaoAuthenticationProvider();
daoAuthenticationProvider.setUserDetailsService(weChatSecurityConfigProperties.getUserDetailsService());
daoAuthenticationProvider.setPasswordEncoder(multiPasswordEncoder());
auth.authenticationProvider(daoAuthenticationProvider);
// 调用 super 将导致不生效 所以下面语句不要写
super.configure(auth);
}

3.2 AuthenticationManager的认证过程

AuthenticationManager的实现ProviderManager管理了众多的AuthenticationProvider。每一个AuthenticationProvider都只支持特定类型的Authentication,然后是对适配到的Authentication进行认证,只要有一个AuthenticationProvider认证成功,那么就认为认证成功,所有的都没有通过才认为是认证失败。认证成功后的Authentication就变成授信凭据,并触发认证成功的事件。认证失败的就抛出异常触发认证失败的事件。

从这里我们可以看出认证管理器AuthenticationManager针对特定的Authentication提供了特定的认证功能,我们可以借此来实现多种认证并存。

4. 总结

通过本文我们对Spring Security认证管理器AuthenticationManager的初始化过程和认证过程进行了分析,如果你熟悉了AuthenticationManager的逻辑可以实现多种认证方式的并存等能力,实现很多有用的逻辑,这对集成Spring Security到项目中非常重要。

转载自@felord.cn

1. 前言

前面关于Spring Security写了两篇文章,一篇是介绍UsernamePasswordAuthenticationFilter,另一篇是介绍 AuthenticationManager。很多同学表示无法理解这两个东西有什么用,能解决哪些实际问题?所以今天就对这两篇理论进行实战运用,我们从零写一个短信验证码登录并适配到Spring Security体系中。如果你在阅读中有什么疑问可以回头看看这两篇文章,能解决很多疑惑。

当然你可以修改成邮箱或者其它通讯设备的验证码登录。

2. 验证码生命周期

验证码存在有效期,一般5分钟。 一般逻辑是用户输入手机号后去获取验证码,服务端对验证码进行缓存。在最大有效期内用户只能使用验证码验证成功一次(避免验证码浪费);超过最大时间后失效。

验证码的缓存生命周期

1
2
3
4
5
6
7
8
9
10
11
12
13
14
15
16
17
18
19
20
21
22
23
24
25
public interface CaptchaCacheStorage {

/**
* 验证码放入缓存.
*
* @param phone the phone
* @return the string
*/
String put(String phone);

/**
* 从缓存取验证码.
*
* @param phone the phone
* @return the string
*/
String get(String phone);

/**
* 验证码手动过期.
*
* @param phone the phone
*/
void expire(String phone);
}

我们一般会借助于缓存中间件,比如RedisEhcacheMemcached等等来做这个事情。为了方便收看该教程的同学们所使用的不同的中间件。这里我结合Spring Cache特意抽象了验证码的缓存处理。

1
2
3
4
5
6
7
8
9
10
11
12
13
14
15
16
17
18
19
20
21
22
23
24
private static final String SMS_CAPTCHA_CACHE = "captcha";
@Bean
CaptchaCacheStorage captchaCacheStorage() {
return new CaptchaCacheStorage() {

@CachePut(cacheNames = SMS_CAPTCHA_CACHE, key = "#phone")
@Override
public String put(String phone) {
return RandomUtil.randomNumbers(5);
}

@Cacheable(cacheNames = SMS_CAPTCHA_CACHE, key = "#phone")
@Override
public String get(String phone) {
return null;
}

@CacheEvict(cacheNames = SMS_CAPTCHA_CACHE, key = "#phone")
@Override
public void expire(String phone) {

}
};
}

务必保证缓存的可靠性,这与用户的体验息息相关。

接着我们就来编写和业务无关的验证码服务了,验证码服务的核心功能有两个:发送验证码验证码校验。其它的诸如统计、黑名单、历史记录可根据实际业务定制。这里只实现核心功能。

1
2
3
4
5
6
7
8
9
10
11
12
13
14
15
16
17
18
19
20
21
22
23
24
25
26
27
28
29
30
31
32
33
34
35
36
37
38
/**
* 验证码服务.
* 两个功能: 发送和校验.
*
* @param captchaCacheStorage the captcha cache storage
* @return the captcha service
*/
@Bean
public CaptchaService captchaService(CaptchaCacheStorage captchaCacheStorage) {
return new CaptchaService() {
@Override
public boolean sendCaptcha(String phone) {
String existed = captchaCacheStorage.get(phone);
if (StringUtils.hasText(existed)) {
// 节约成本的话如果缓存中有当前手机可用的验证码 不再发新的验证码
return true;
}
// 生成验证码并放入缓存
String captchaCode = captchaCacheStorage.put(phone);
log.info("captcha: {}", captchaCode);

//todo 这里自行完善调用第三方短信服务发送验证码
return true;
}

@Override
public boolean verifyCaptcha(String phone, String code) {
String cacheCode = captchaCacheStorage.get(phone);

if (Objects.equals(cacheCode, code)) {
// 验证通过手动过期
captchaCacheStorage.expire(phone);
return true;
}
return false;
}
};
}

接下来就可以根据CaptchaService编写短信发送接口/captcha/{phone}了。

1
2
3
4
5
6
7
8
9
10
11
12
13
14
15
16
17
18
19
20
21
22
23
24
25
@RestController
@RequestMapping("/captcha")
public class CaptchaController {

@Resource
CaptchaService captchaService;


/**
* 模拟手机号发送验证码.
*
* @param phone the mobile
* @return the rest
*/
@GetMapping("/{phone}")
public Rest<?> captchaByMobile(@PathVariable String phone) {
//todo 手机号 正则自行验证

if (captchaService.sendCaptcha(phone)){
return RestBody.ok("验证码发送成功");
}
return RestBody.failure(-999,"验证码发送失败");
}

}

3. 集成到Spring Security

下面的教程就必须用到前两篇介绍的知识了。我们要实现验证码登录就必须定义一个Servlet Filter进行处理。它的作用这里再重复一下:

  • 拦截短信登录接口。
  • 获取登录参数并封装为Authentication凭据。
  • 交给AuthenticationManager认证。

我们需要先定制AuthenticationAuthenticationManager

3.1 验证码凭据

Authentication在我看来就是一个载体,在未得到认证之前它用来携带登录的关键参数,比如用户名和密码、验证码;在认证成功后它携带用户的信息和角色集。所以模仿UsernamePasswordAuthenticationToken来实现一个CaptchaAuthenticationToken,去掉不必要的功能,抄就完事儿了:

1
2
3
4
5
6
7
8
9
10
11
12
13
14
15
16
17
18
19
20
21
22
23
24
25
26
27
28
29
30
31
32
33
34
35
36
37
38
39
40
41
42
43
44
45
46
47
48
49
50
51
52
53
54
55
56
57
58
59
60
61
62
63
64
65
66
67
68
69
70
71
package cn.felord.spring.security.captcha;

import org.springframework.security.authentication.AbstractAuthenticationToken;
import org.springframework.security.core.GrantedAuthority;
import org.springframework.security.core.SpringSecurityCoreVersion;

import java.util.Collection;

/**
* 验证码认证凭据.
* @author felord.cn
*/
public class CaptchaAuthenticationToken extends AbstractAuthenticationToken {

private static final long serialVersionUID = SpringSecurityCoreVersion.SERIAL_VERSION_UID;

private final Object principal;
private String captcha;

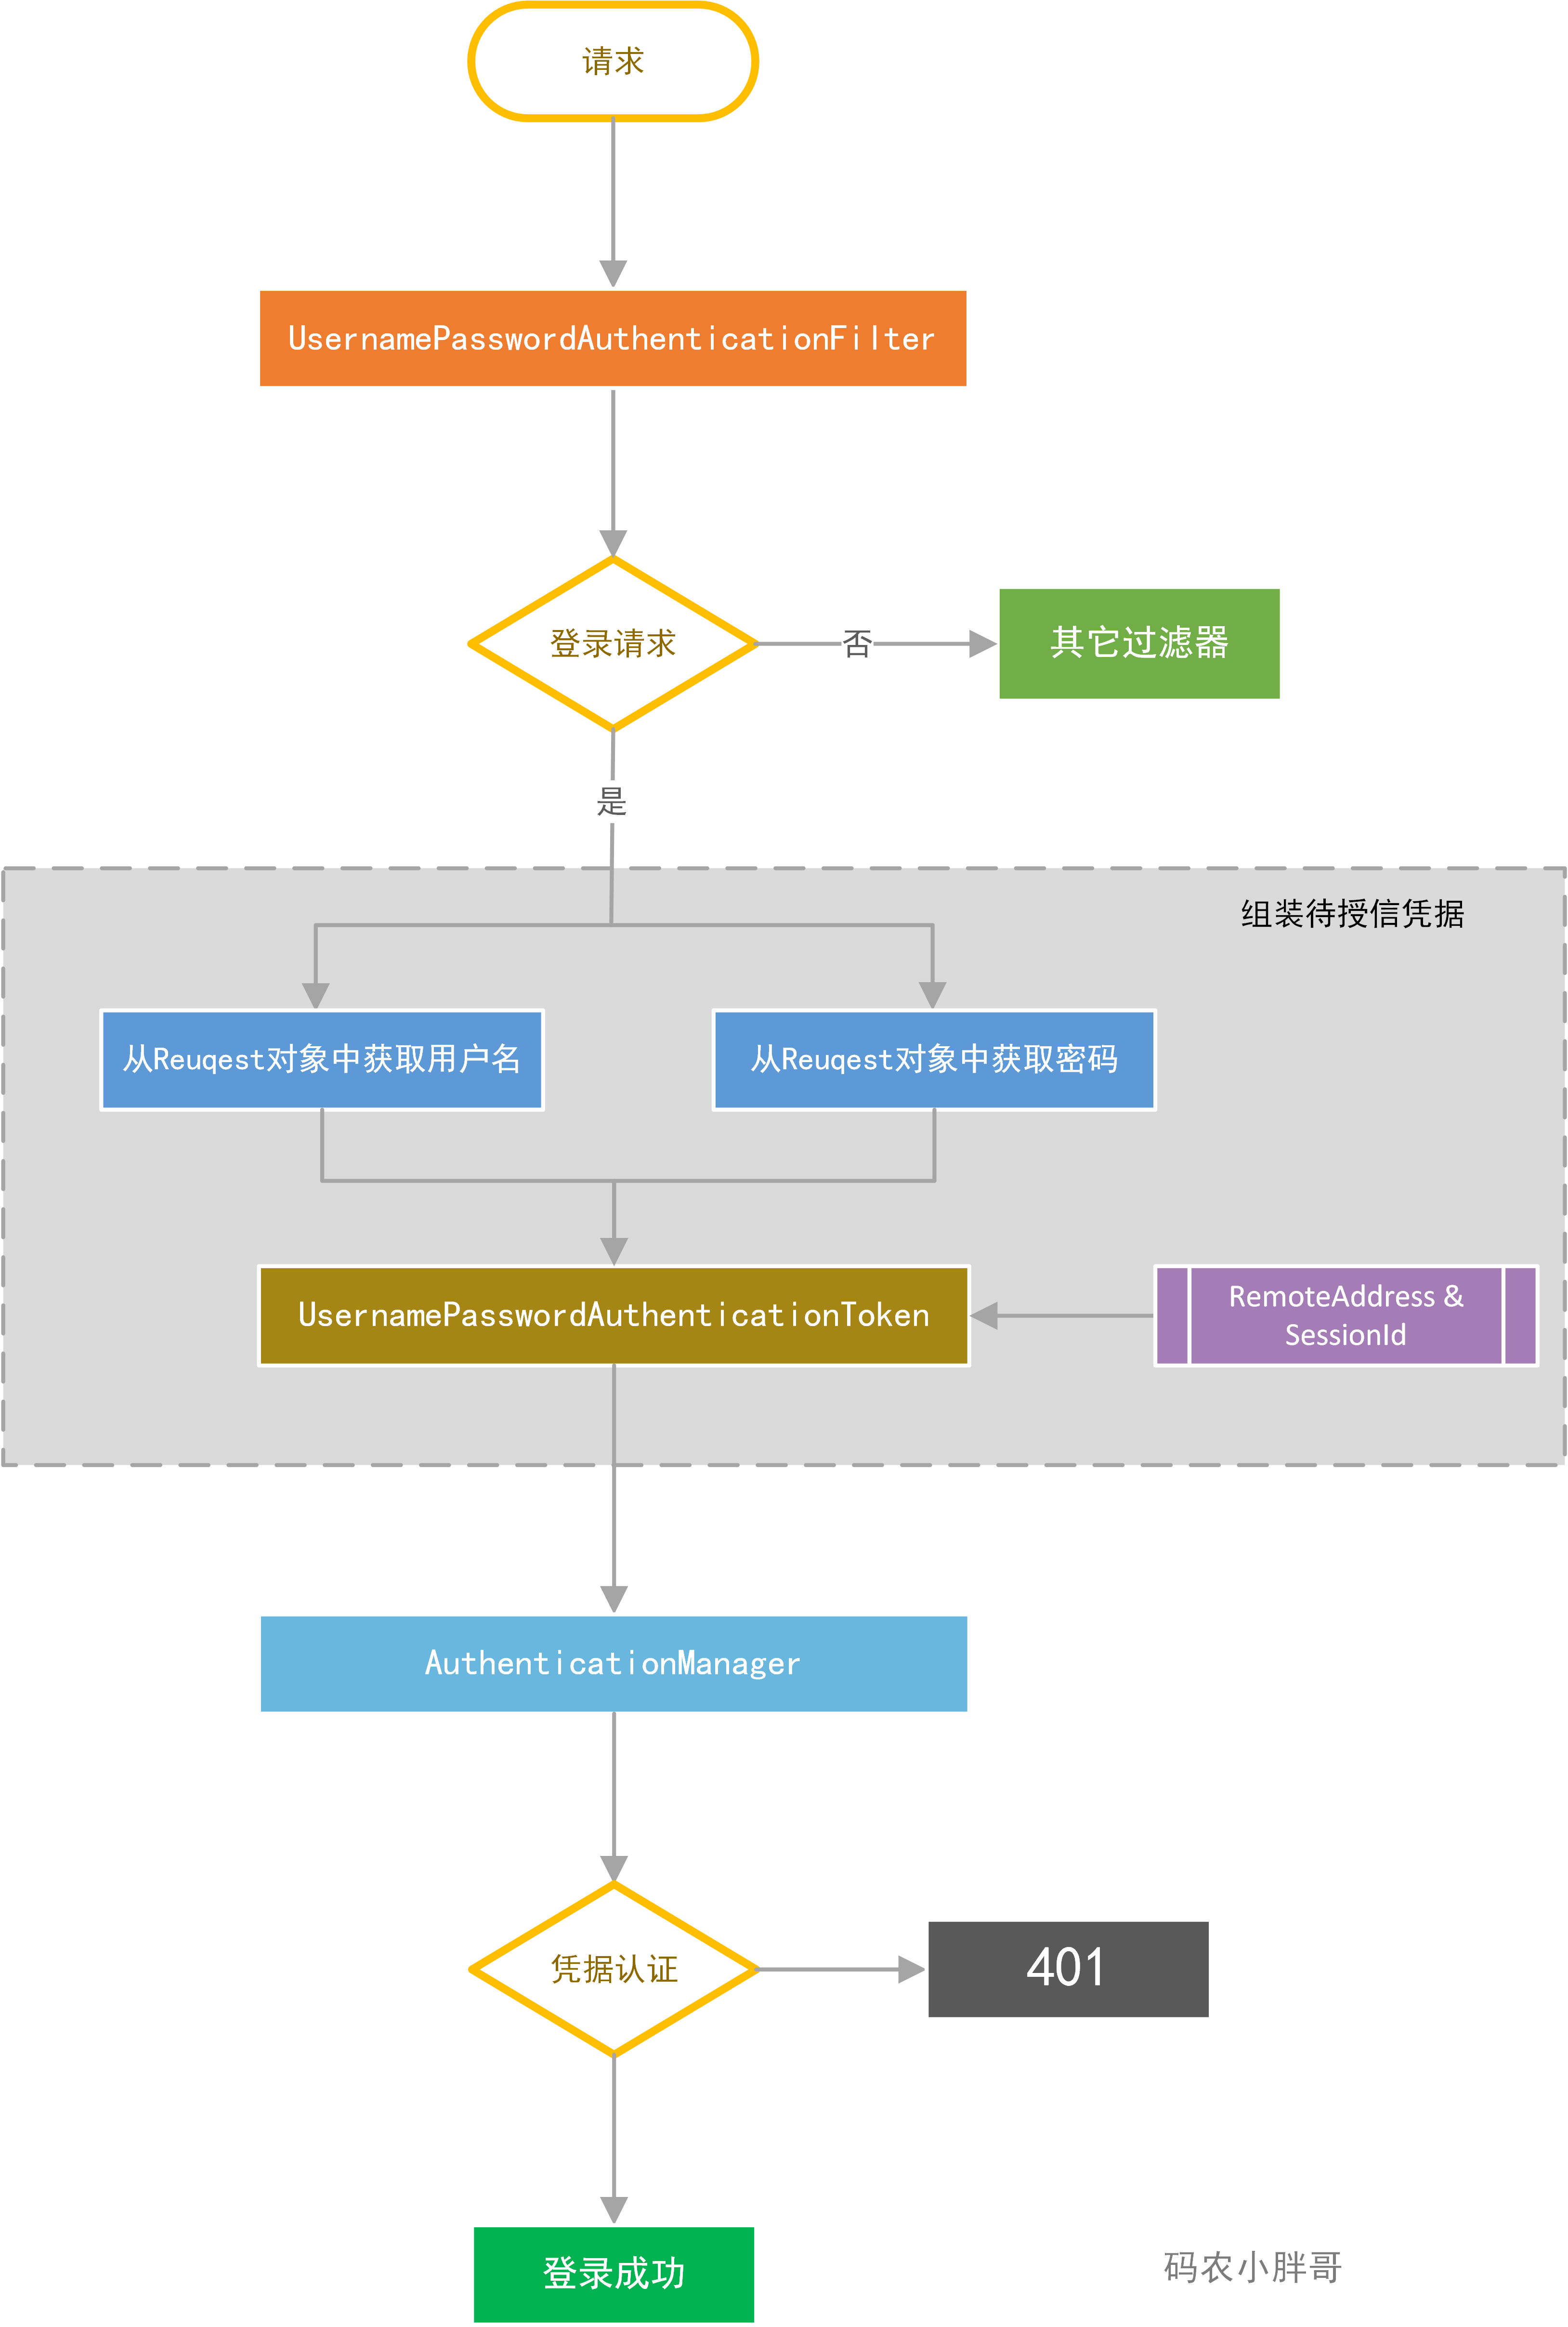
/**
* 此构造函数用来初始化未授信凭据.
*
* @param principal the principal
* @param captcha the captcha
* @see CaptchaAuthenticationToken#CaptchaAuthenticationToken(Object, String, Collection)
*/
public CaptchaAuthenticationToken(Object principal, String captcha) {
super(null);
this.principal = principal;
this.captcha = captcha;
setAuthenticated(false);
}

/**
* 此构造函数用来初始化授信凭据.
*
* @param principal the principal
* @param captcha the captcha
* @param authorities the authorities
* @see CaptchaAuthenticationToken#CaptchaAuthenticationToken(Object, String)
*/
public CaptchaAuthenticationToken(Object principal, String captcha,
Collection<? extends GrantedAuthority> authorities) {
super(authorities);
this.principal = principal;
this.captcha = captcha;
super.setAuthenticated(true); // must use super, as we override
}

public Object getCredentials() {
return this.captcha;
}

public Object getPrincipal() {
return this.principal;
}

public void setAuthenticated(boolean isAuthenticated) throws IllegalArgumentException {
if (isAuthenticated) {
throw new IllegalArgumentException(
"Cannot set this token to trusted - use constructor which takes a GrantedAuthority list instead");
}

super.setAuthenticated(false);
}

@Override
public void eraseCredentials() {
super.eraseCredentials();
captcha = null;
}

3.2 验证码认证管理器

我们还需要定制一个AuthenticationManager来对上面定义的凭据CaptchaAuthenticationToken进行认证处理。下面这张图有必要再拿出来看一下:

要定义AuthenticationManager只需要定义其实现ProviderManager。而ProviderManager又需要依赖AuthenticationProvider。所以我们要实现一个专门处理CaptchaAuthenticationTokenAuthenticationProviderAuthenticationProvider的流程是:

  1. CaptchaAuthenticationToken拿到手机号、验证码。
  2. 利用手机号从数据库查询用户信息,并判断用户是否是有效用户,实际上就是实现UserDetailsService接口
  3. 验证码校验。
  4. 校验成功则封装授信的凭据。
  5. 校验失败抛出认证异常。

根据这个流程实现如下:

1
2
3
4
5
6
7
8
9
10
11
12
13
14
15
16
17
18
19
20
21
22
23
24
25
26
27
28
29
30
31
32
33
34
35
36
37
38
39
40
41
42
43
44
45
46
47
48
49
50
51
52
53
54
55
56
57
58
59
60
61
62
63
64
65
66
67
68
69
70
71
72
73
74
75
76
77
78
79
80
81
82
83
84
85
86
87
88
89
90
91
92
93
94
95
96
97
98
99
100
101
102
103
104
105
106
package cn.felord.spring.security.captcha;

import lombok.extern.slf4j.Slf4j;
import org.springframework.beans.factory.InitializingBean;
import org.springframework.context.MessageSource;
import org.springframework.context.MessageSourceAware;
import org.springframework.context.support.MessageSourceAccessor;
import org.springframework.security.authentication.AuthenticationProvider;
import org.springframework.security.authentication.BadCredentialsException;
import org.springframework.security.core.Authentication;
import org.springframework.security.core.AuthenticationException;
import org.springframework.security.core.GrantedAuthority;
import org.springframework.security.core.SpringSecurityMessageSource;
import org.springframework.security.core.authority.mapping.GrantedAuthoritiesMapper;
import org.springframework.security.core.authority.mapping.NullAuthoritiesMapper;
import org.springframework.security.core.userdetails.UserDetails;
import org.springframework.security.core.userdetails.UserDetailsService;
import org.springframework.util.Assert;

import java.util.Collection;
import java.util.Objects;

/**
* 验证码认证器.
* @author felord.cn
*/
@Slf4j
public class CaptchaAuthenticationProvider implements AuthenticationProvider, InitializingBean, MessageSourceAware {
private final GrantedAuthoritiesMapper authoritiesMapper = new NullAuthoritiesMapper();
private final UserDetailsService userDetailsService;
private final CaptchaService captchaService;
private MessageSourceAccessor messages = SpringSecurityMessageSource.getAccessor();

/**
* Instantiates a new Captcha authentication provider.
*
* @param userDetailsService the user details service
* @param captchaService the captcha service
*/
public CaptchaAuthenticationProvider(UserDetailsService userDetailsService, CaptchaService captchaService) {
this.userDetailsService = userDetailsService;
this.captchaService = captchaService;
}

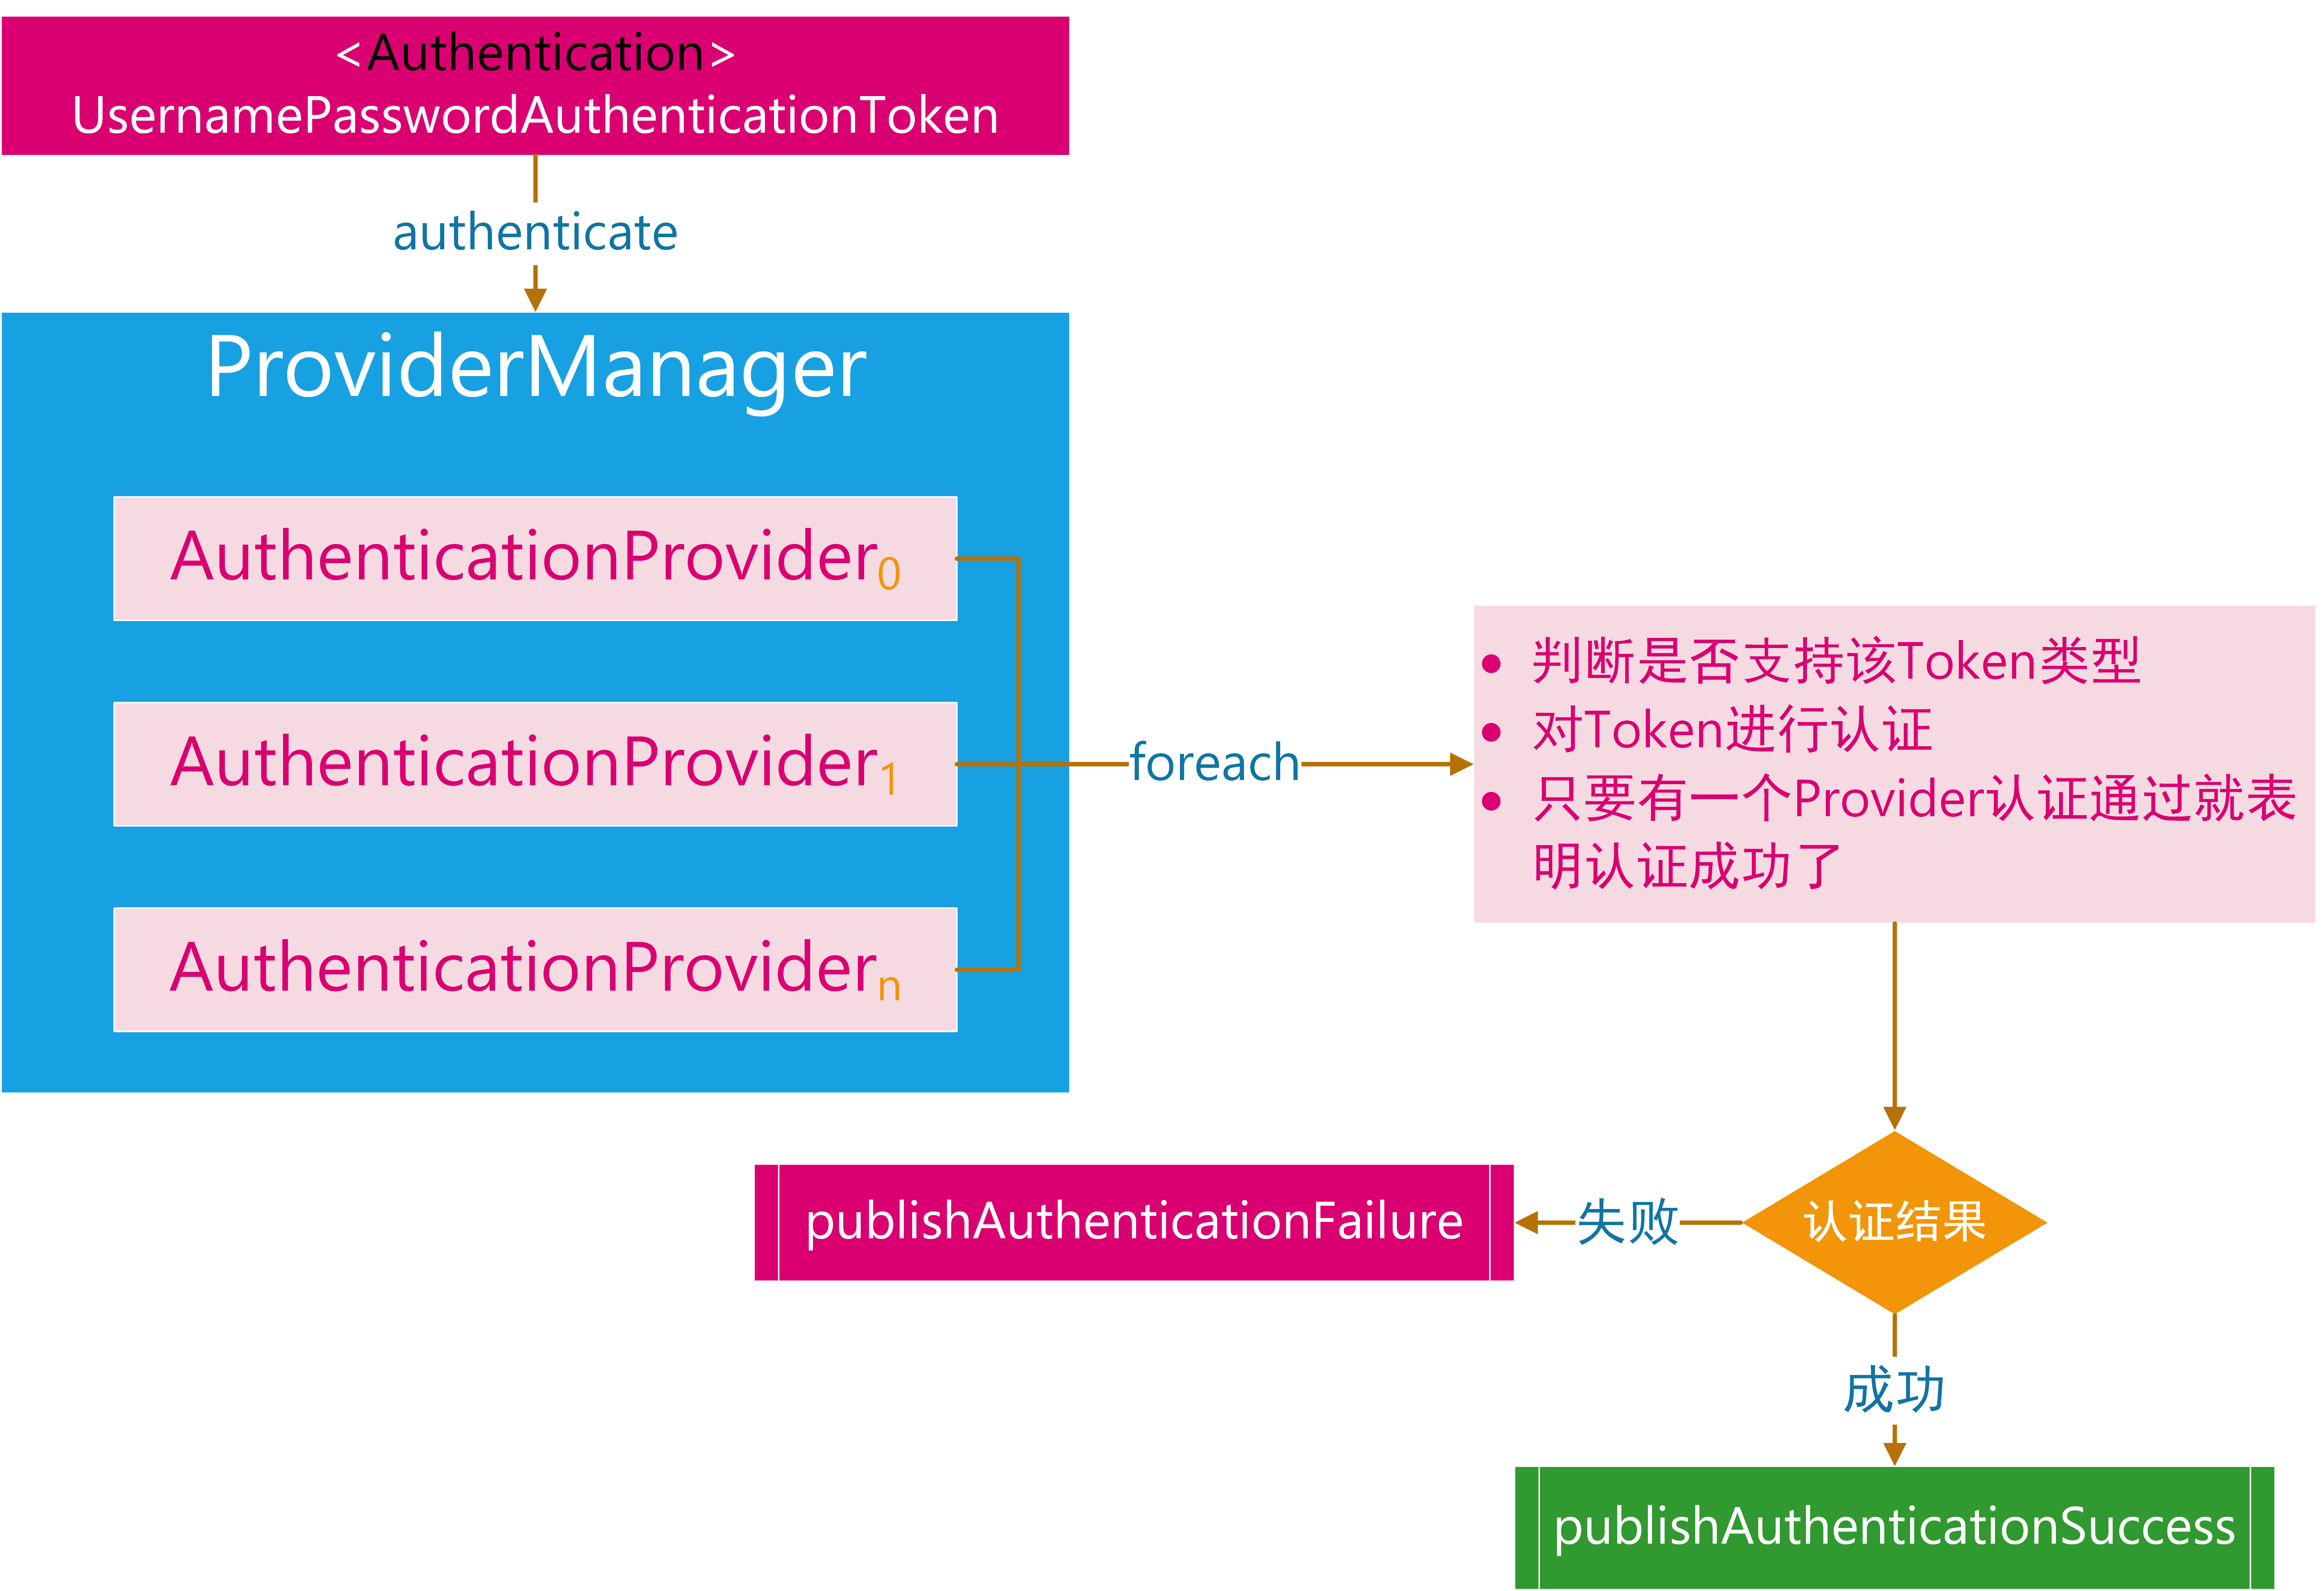
@Override
public Authentication authenticate(Authentication authentication) throws AuthenticationException {
Assert.isInstanceOf(CaptchaAuthenticationToken.class, authentication,
() -> messages.getMessage(
"CaptchaAuthenticationProvider.onlySupports",
"Only CaptchaAuthenticationToken is supported"));

CaptchaAuthenticationToken unAuthenticationToken = (CaptchaAuthenticationToken) authentication;

String phone = unAuthenticationToken.getName();
String rawCode = (String) unAuthenticationToken.getCredentials();

UserDetails userDetails = userDetailsService.loadUserByUsername(phone);

// 此处省略对UserDetails 的可用性 是否过期 是否锁定 是否失效的检验 建议根据实际情况添加 或者在 UserDetailsService 的实现中处理
if (Objects.isNull(userDetails)) {
throw new BadCredentialsException("Bad credentials");
}

// 验证码校验
if (captchaService.verifyCaptcha(phone, rawCode)) {
return createSuccessAuthentication(authentication, userDetails);
} else {
throw new BadCredentialsException("captcha is not matched");
}

}

@Override
public boolean supports(Class<?> authentication) {
return CaptchaAuthenticationToken.class.isAssignableFrom(authentication);
}

@Override
public void afterPropertiesSet() throws Exception {
Assert.notNull(userDetailsService, "userDetailsService must not be null");
Assert.notNull(captchaService, "captchaService must not be null");
}

@Override
public void setMessageSource(MessageSource messageSource) {
this.messages = new MessageSourceAccessor(messageSource);
}

/**
* 认证成功将非授信凭据转为授信凭据.
* 封装用户信息 角色信息。
*
* @param authentication the authentication
* @param user the user
* @return the authentication
*/
protected Authentication createSuccessAuthentication(Authentication authentication, UserDetails user) {

Collection<? extends GrantedAuthority> authorities = authoritiesMapper.mapAuthorities(user.getAuthorities());
CaptchaAuthenticationToken authenticationToken = new CaptchaAuthenticationToken(user, null, authorities);
authenticationToken.setDetails(authentication.getDetails());

return authenticationToken;
}

}

然后就可以组装ProviderManager了:

1
ProviderManager providerManager = new ProviderManager(Collections.singletonList(captchaAuthenticationProvider));

经过3.13.2的准备,我们的准备工作就完成了。

3.3 验证码认证过滤器

定制好验证码凭据和验证码认证管理器后我们就可以定义验证码认证过滤器了。修改一下UsernamePasswordAuthenticationFilter就能满足需求:

1
2
3
4
5
6
7
8
9
10
11
12
13
14
15
16
17
18
19
20
21
22
23
24
25
26
27
28
29
30
31
32
33
34
35
36
37
38
39
40
41
42
43
44
45
46
47
48
49
50
51
52
53
54
55
56
57
58
59
60
61
62
63
64
65
66
67
68
69
package cn.felord.spring.security.captcha;

import org.springframework.lang.Nullable;
import org.springframework.security.authentication.AuthenticationServiceException;
import org.springframework.security.core.Authentication;
import org.springframework.security.core.AuthenticationException;
import org.springframework.security.web.authentication.AbstractAuthenticationProcessingFilter;
import org.springframework.security.web.util.matcher.AntPathRequestMatcher;

import javax.servlet.http.HttpServletRequest;
import javax.servlet.http.HttpServletResponse;

public class CaptchaAuthenticationFilter extends AbstractAuthenticationProcessingFilter {


public static final String SPRING_SECURITY_FORM_PHONE_KEY = "phone";
public static final String SPRING_SECURITY_FORM_CAPTCHA_KEY = "captcha";


public CaptchaAuthenticationFilter() {
super(new AntPathRequestMatcher("/clogin", "POST"));
}

public Authentication attemptAuthentication(HttpServletRequest request,
HttpServletResponse response) throws AuthenticationException {

if (!request.getMethod().equals("POST")) {
throw new AuthenticationServiceException(
"Authentication method not supported: " + request.getMethod());
}

String phone = obtainPhone(request);
String captcha = obtainCaptcha(request);

if (phone == null) {
phone = "";
}

if (captcha == null) {
captcha = "";
}

phone = phone.trim();

CaptchaAuthenticationToken authRequest = new CaptchaAuthenticationToken(
phone, captcha);

// Allow subclasses to set the "details" property
setDetails(request, authRequest);

return this.getAuthenticationManager().authenticate(authRequest);
}

@Nullable
protected String obtainCaptcha(HttpServletRequest request) {
return request.getParameter(SPRING_SECURITY_FORM_CAPTCHA_KEY);
}

@Nullable
protected String obtainPhone(HttpServletRequest request) {
return request.getParameter(SPRING_SECURITY_FORM_PHONE_KEY);
}

protected void setDetails(HttpServletRequest request,
CaptchaAuthenticationToken authRequest) {
authRequest.setDetails(authenticationDetailsSource.buildDetails(request));
}

}

这里我们指定了拦截验证码登陆的请求为:

1
2
3
POST /clogin?phone=手机号&captcha=验证码 HTTP/1.1

Host: localhost:8082

接下来就是配置了。

3.4 配置

我把所有的验证码认证的相关配置集中了起来,并加上了注释。

1
2
3
4
5
6
7
8
9
10
11
12
13
14
15
16
17
18
19
20
21
22
23
24
25
26
27
28
29
30
31
32
33
34
35
36
37
38
39
40
41
42
43
44
45
46
47
48
49
50
51
52
53
54
55
56
57
58
59
60
61
62
63
64
65
66
67
68
69
70
71
72
73
74
75
76
77
78
79
80
81
82
83
84
85
86
87
88
89
90
91
92
93
94
95
96
97
98
99
100
101
102
103
104
105
106
107
108
109
110
111
112
113
114
115
116
117
118
119
120
121
122
123
124
125
126
127
128
129
130
131
132
133
134
135
136
137
138
139
140
141
142
143
144
145
146
147
148
149
150
151
152
153
154
155
package cn.felord.spring.security.captcha;

import cn.hutool.core.util.RandomUtil;
import lombok.extern.slf4j.Slf4j;
import org.springframework.beans.factory.annotation.Qualifier;
import org.springframework.cache.annotation.CacheEvict;
import org.springframework.cache.annotation.CachePut;
import org.springframework.cache.annotation.Cacheable;
import org.springframework.context.annotation.Bean;
import org.springframework.context.annotation.Configuration;
import org.springframework.security.authentication.ProviderManager;
import org.springframework.security.core.authority.AuthorityUtils;
import org.springframework.security.core.userdetails.User;
import org.springframework.security.core.userdetails.UserDetailsService;
import org.springframework.security.web.authentication.AuthenticationFailureHandler;
import org.springframework.security.web.authentication.AuthenticationSuccessHandler;
import org.springframework.util.StringUtils;

import java.util.Collections;
import java.util.Objects;

/**
* 验证码认证配置.
*
* @author felord.cn
* @since 13 :23
*/
@Slf4j
@Configuration
public class CaptchaAuthenticationConfiguration {
private static final String SMS_CAPTCHA_CACHE = "captcha";

/**
* spring cache 管理验证码的生命周期.
*
* @return the captcha cache storage
*/
@Bean
CaptchaCacheStorage captchaCacheStorage() {
return new CaptchaCacheStorage() {

@CachePut(cacheNames = SMS_CAPTCHA_CACHE, key = "#phone")
@Override
public String put(String phone) {
return RandomUtil.randomNumbers(5);
}

@Cacheable(cacheNames = SMS_CAPTCHA_CACHE, key = "#phone")
@Override
public String get(String phone) {
return null;
}

@CacheEvict(cacheNames = SMS_CAPTCHA_CACHE, key = "#phone")
@Override
public void expire(String phone) {

}
};
}

/**
* 验证码服务.
* 两个功能: 发送和校验.
*
* @param captchaCacheStorage the captcha cache storage
* @return the captcha service
*/
@Bean
public CaptchaService captchaService(CaptchaCacheStorage captchaCacheStorage) {
return new CaptchaService() {
@Override
public boolean sendCaptcha(String phone) {
String existed = captchaCacheStorage.get(phone);
if (StringUtils.hasText(existed)) {
// 节约成本的话如果缓存存在可用的验证码 不再发新的验证码
log.warn("captcha code 【 {} 】 is available now", existed);
return false;
}
// 生成验证码并放入缓存
String captchaCode = captchaCacheStorage.put(phone);
log.info("captcha: {}", captchaCode);

//todo 这里自行完善调用第三方短信服务
return true;
}

@Override
public boolean verifyCaptcha(String phone, String code) {
String cacheCode = captchaCacheStorage.get(phone);

if (Objects.equals(cacheCode, code)) {
// 验证通过手动过期
captchaCacheStorage.expire(phone);
return true;
}
return false;
}
};
}

/**
* 自行实现根据手机号查询可用的用户,这里简单举例.
* 注意该接口可能出现多态。所以最好加上注解@Qualifier
*
* @return the user details service
*/
@Bean
@Qualifier("captchaUserDetailsService")
public UserDetailsService captchaUserDetailsService() {
// 验证码登陆后密码无意义了但是需要填充一下
return username -> User.withUsername(username).password("TEMP")
//todo 这里权限 你需要自己注入
.authorities(AuthorityUtils.createAuthorityList("ROLE_ADMIN", "ROLE_APP")).build();
}

/**
* 验证码认证器.
*
* @param captchaService the captcha service
* @param userDetailsService the user details service
* @return the captcha authentication provider
*/
@Bean
public CaptchaAuthenticationProvider captchaAuthenticationProvider(CaptchaService captchaService,
@Qualifier("captchaUserDetailsService")
UserDetailsService userDetailsService) {
return new CaptchaAuthenticationProvider(userDetailsService, captchaService);
}


/**
* 验证码认证过滤器.
*
* @param authenticationSuccessHandler the authentication success handler
* @param authenticationFailureHandler the authentication failure handler
* @param captchaAuthenticationProvider the captcha authentication provider
* @return the captcha authentication filter
*/
@Bean
public CaptchaAuthenticationFilter captchaAuthenticationFilter(AuthenticationSuccessHandler authenticationSuccessHandler,
AuthenticationFailureHandler authenticationFailureHandler,
CaptchaAuthenticationProvider captchaAuthenticationProvider) {
CaptchaAuthenticationFilter captchaAuthenticationFilter = new CaptchaAuthenticationFilter();
// 配置 authenticationManager
ProviderManager providerManager = new ProviderManager(Collections.singletonList(captchaAuthenticationProvider));
captchaAuthenticationFilter.setAuthenticationManager(providerManager);
// 成功处理器
captchaAuthenticationFilter.setAuthenticationSuccessHandler(authenticationSuccessHandler);
// 失败处理器
captchaAuthenticationFilter.setAuthenticationFailureHandler(authenticationFailureHandler);

return captchaAuthenticationFilter;
}
}

然而这并没有完,你需要将CaptchaAuthenticationFilter配置到整个Spring Security的过滤器链中,这种看了胖哥教程的同学应该非常熟悉了。

请特别注意:务必保证登录接口和验证码接口可以匿名访问,如果是动态权限可以给接口添加ROLE_ANONYMOUS角色。

大功告成,测试如下:


而且原先的登录方式不受影响。

4. 总结

通过对UsernamePasswordAuthenticationFilter和 AuthenticationManager的系统学习,我们了解了Spring Security认证的整个流程,本文是对这两篇的一个实际运用。相信看到这一篇后你就不会对前几篇的图解懵逼了,这也是理论到实践的一次尝试。

代码在day11分支

转载自@felord.cn

1. 前言

欢迎阅读Spring Security 实战干货系列文章,在集成Spring Security安全框架的时候我们最先处理的可能就是根据我们项目的实际需要来定制注册登录了,尤其是Http登录认证。根据以前的相关文章介绍,Http登录认证由过滤器UsernamePasswordAuthenticationFilter进行处理。我们只有把这个过滤器搞清楚才能做一些定制化。今天我们就简单分析它的源码和工作流程。

2. UsernamePasswordAuthenticationFilter 源码分析

UsernamePasswordAuthenticationFilter继承于AbstractAuthenticationProcessingFilter(另文分析)。它的作用是拦截登录请求并获取账号和密码,然后把账号密码封装到认证凭据UsernamePasswordAuthenticationToken中,然后把凭据交给特定配置的AuthenticationManager去作认证。源码分析如下:

1
2
3
4
5
6
7
8
9
10
11
12
13
14
15
16
17
18
19
20
21
22
23
24
25
26
27
28
29
30
31
32
33
34
35
36
37
38
39
40
41
42
43
44
45
46
47
48
49
50
51
52
53
54
55
56
57
58
59
60
61
62
63
64
65
66
67
68
69
70
71
72
73
74
75
76
77
78
79
80
81
82
83
84
85
86
87
88
89
90
91
92
public class UsernamePasswordAuthenticationFilter extends
AbstractAuthenticationProcessingFilter {
// 默认取账户名、密码的key
public static final String SPRING_SECURITY_FORM_USERNAME_KEY = "username";
public static final String SPRING_SECURITY_FORM_PASSWORD_KEY = "password";
// 可以通过对应的set方法修改
private String usernameParameter = SPRING_SECURITY_FORM_USERNAME_KEY;
private String passwordParameter = SPRING_SECURITY_FORM_PASSWORD_KEY;
// 默认只支持 POST 请求
private boolean postOnly = true;

// 初始化一个用户密码 认证过滤器 默认的登录uri 是 /login 请求方式是POST
public UsernamePasswordAuthenticationFilter() {
super(new AntPathRequestMatcher("/login", "POST"));
}

// 实现其父类 AbstractAuthenticationProcessingFilter 提供的钩子方法 用去尝试认证
public Authentication attemptAuthentication(HttpServletRequest request,
HttpServletResponse response) throws AuthenticationException {
// 判断请求方式是否是POST
if (postOnly && !request.getMethod().equals("POST")) {
throw new AuthenticationServiceException(
"Authentication method not supported: " + request.getMethod());
}

// 先去 HttpServletRequest 对象中获取账号名、密码
String username = obtainUsername(request);
String password = obtainPassword(request);

if (username == null) {
username = "";
}

if (password == null) {
password = "";
}

username = username.trim();

// 然后把账号名、密码封装到 一个认证Token对象中,这是就是一个通行证,但是这时的状态时不可信的,一旦通过认证就变为可信的
UsernamePasswordAuthenticationToken authRequest = new UsernamePasswordAuthenticationToken(
username, password);

// 会将 HttpServletRequest 中的一些细节 request.getRemoteAddr() request.getSession 存入的到Token中
setDetails(request, authRequest);

// 然后 使用 父类中的 AuthenticationManager 对Token 进行认证
return this.getAuthenticationManager().authenticate(authRequest);
}
// 获取密码 很重要 如果你想改变获取密码的方式要么在此处重写,要么通过自定义一个前置的过滤器保证能此处能get到
@Nullable
protected String obtainPassword(HttpServletRequest request) {
return request.getParameter(passwordParameter);
}

// 获取账户很重要 如果你想改变获取密码的方式要么在此处重写,要么通过自定义一个前置的过滤器保证能此处能get到
@Nullable
protected String obtainUsername(HttpServletRequest request) {
return request.getParameter(usernameParameter);
}

// 参见上面对应的说明为凭据设置一些请求细节
protected void setDetails(HttpServletRequest request,
UsernamePasswordAuthenticationToken authRequest) {
authRequest.setDetails(authenticationDetailsSource.buildDetails(request));
}

// 设置账户参数的key
public void setUsernameParameter(String usernameParameter) {
Assert.hasText(usernameParameter, "Username parameter must not be empty or null");
this.usernameParameter = usernameParameter;
}

// 设置密码参数的key
public void setPasswordParameter(String passwordParameter) {
Assert.hasText(passwordParameter, "Password parameter must not be empty or null");
this.passwordParameter = passwordParameter;
}

// 认证的请求方式是只支持POST请求
public void setPostOnly(boolean postOnly) {
this.postOnly = postOnly;
}

public final String getUsernameParameter() {
return usernameParameter;
}

public final String getPasswordParameter() {
return passwordParameter;
}
}

为了加强对流程的理解,我特意画了一张图来对这个流程进行清晰的说明:

3. 我们可以定制什么

根据上面的流程,我们理解了UsernamePasswordAuthenticationFilter工作流程后可以做这些事情:

  • 定制我们的登录请求URI和请求方式。
  • 登录请求参数的格式定制化,比如可以使用JSON格式提交甚至几种并存。
  • 将用户名和密码封装入凭据UsernamePasswordAuthenticationToken,定制业务场景需要的特殊凭据。

4. 我们会有什么疑问

AuthenticationManager从哪儿来,它又是什么,它是如何对凭据进行认证的,认证成功的后续细节是什么,认证失败的后续细节是什么。不要走开,持续关注为你揭晓这个答案。

转载自@felord.cn

1. 前言

Spring Security真正的过滤器体系是我们了解它是如何进行认证授权防止利用漏洞的关键。

2. Servlet Filter体系

这里我们以Servlet Web为讨论目标,Reactive Web暂不讨论。我们先来看下最基础的Servlet体系,在Servlet体系中客户端发起一个请求过程是经过0到N个Filter然后交给Servlet处理。

Filter不但可以修改HttpServletRequestHttpServletResponse,可以让我们在请求响应的前后做一些事情,甚至可以终止过滤器链FilterChain的传递。

1
2
3
4
5
6
7
8
public void doFilter(ServletRequest request, ServletResponse response, FilterChain chain) {
// 请求被servlet 处理前
if(condition){
// 根据条件来进入下一个过滤器
chain.doFilter(request, response);
}
// 请求被执行完毕后处理一些事情
}

3. GenericFilterBean

Spring Security利用了Spring IOCAOP的特性而无法脱离Spring独立存在,而Apache Shiro可以独立存在。所以今天我们要一探究竟,看看他们是如何结合的。

Spring结合Servlet Filter自然是要为Servlet Filter注入Spring Bean的特性,所以就搞出了一个抽象Filter Bean,这个抽象过滤器GenericFilterBean并不是在Spring Security下,而是Spring Web体系中,类图如下:

从类图上看Filter接口已经被注入了多个Spring Bean的特性,纳入了Spring Bean生命周期,使得Spring IoC容器能够充分的管理Filter

4. DelegatingFilterProxy

我们希望Servlet能够按照它自己的标准来注册到过滤器链中工作,但是同时也希望它能够被Spring IoC管理,所以Spring提供了一个GenericFilterBean的实现DelegatingFilterProxy。我们可以将原生的Servlet Filter或者Spring Bean Filter委托给DelegatingFilterProxy,然后在结合到Servlet FilterChain中。

5. SecurityFilterChain

针对不同符合Ant Pattern的请求可能会走不同的过滤器链,比如登录会去验证,然后返回登录结果;管理后台的接口走后台的安全逻辑,应用客户端的接口走客户端的安全逻辑。Spring Security提供了一个SecurityFilterChain接口来满足被匹配HttpServletRequest走特定的过滤器链的需求。

1
2
3
4
5
6
public interface SecurityFilterChain {
// 判断请求 是否符合该过滤器链的要求
boolean matches(HttpServletRequest request);
// 对应的过滤器链
List<Filter> getFilters();
}

6. FilterChainProxy

不同的SecurityFilterChain应该是互斥而且平等的,它们之间不应该是上下游关系。

如上图请求被匹配到不同的SecurityFilterChain然后在执行剩余的过滤器链。它们经过SecurityFilterChain的总流程是相似的,而且有些时候特定的一些SecurityFilterChain也需要被集中管理来实现特定一揽子的请求的过滤逻辑。所以就有了另外一个GenericFilterBean实现来做这个事情,它就是FilterChainProxy。它的作用就是拦截符合条件的请求,然后根据请求筛选出符合要求的SecurityFilterChain,然后链式的执行这些Filter,最后继续执行剩下的FilterChain

7. 总结

结合上面,最终上述这些概念的关系彻底搞清楚了,搞清楚过滤器的运作模式对于学习和使用Spring Security至关重要。

转载自@felord.cn

0%